ZenduONE Admin Portal User Guide
Written By Shubham Mishra
Introduction
The ZenduONE Admin Portal serves as a powerful tool for overseeing and optimizing the functionalities critical to the seamless operation of your ZenduONE solution. Whether you are configuring database settings, white labeling experiences, managing user access, or monitoring device deployments, this guide will provide you with step-by-step instructions and best practices to navigate the portal with confidence.
Key Features of the Admin Portal:
Customer Database Management: Configure and maintain databases to ensure optimal performance and feature enablement.
Reseller White Labeling: Customize the appearance and branding of the platform to match your reseller's identity through comprehensive white labeling settings, including logos, color schemes, and custom domains.
User Management: Efficiently manage user accounts, permissions, and access rights across the platform.
Device Management: Monitor and assign devices connected to ZenduONE, ensuring accurate and efficient setup.
Getting started
Setup Stages
In order to add users and devices, it is essential to first set up a company database where these entities will be managed.
Setup Hierarchy:
Creating a customer database and granting access
A customer's ZenduONE database is created when you save their Company record. There is no separate "create database" action, and a customer cannot log in until both a Company and a login-capable User exist.
Order matters. The Company must exist before a user can be assigned to it:
Go to Companies and click + Company.
Complete the fields in Company > Details and save. Saving creates the customer's ZenduONE database. The mandatory fields are Account status, Company Name, Reseller, Industry, Currency, Total Fleet, Main Fleet Contact Name and Main Contact Email.
Reopen the company to configure Company > Devices, Company > Plans and Company > Integrations. The Devices tab does not appear until after the company has been saved.
Go to Users and click + User. Select the new company in the Company field, then set User Role.
To have the system email the credentials, enable Auto-Generate Password and Send Email with Login Details to User. If you set a password manually, no email is sent and you must pass the login details on yourself.
Constraints and common failures at this step:
A user with the NoAccess role exists in the system but cannot log in to the portal. If a customer says they were created but cannot get in, check the role before anything else.
You do not need the customer's credentials to check their account. Use Logging into ZenduONE as a specific User from the Users module.
Resellers Module
In certain instances, as a Reseller, you may oversee additional resellers who distribute ZenduONE products under your umbrella. To establish a subordinate reseller, you must create an account for them within the reseller module.
Example of an hierarchy with multiple layers of resellers:
In the following view, it is evident that the reseller “Subdomain” has included another reseller “Reseller Level 2” under their management. This grants "Reseller Level 2" an account for creating companies, users, and devices. Notably, since “Reseller Level 2” operates under the "Subdomain" reseller, "Subdomain" retains the ability to monitor and oversee companies, users, and devices managed by “Reseller Level 2”.

Adding a Reseller
+ Add Reseller – Add a new reseller
Note: By default, the current reseller creating the new reseller will act as the parent in the hierarchy, with the newly added reseller set up as its child account. The child reseller account will not have visibility or access to the parent reseller's companies, users, devices, or other child reseller accounts. However, the parent reseller will have access to the child reseller account's entities.
When a reseller account is created, a corresponding Company account is automatically generated. This Company account sets up a dedicated ZenduONE database for the reseller, allowing them to log in for demos, testing, or training purposes. Additionally, any devices they order or have shipped will be initially assigned to this database, giving them full control to later reassign devices to their customers’ accounts as needed.
Reseller > Account Details
Enter information about the new reseller:
Account
Reseller Name
Email
Zoho CRM Account ID (If you don’t already have a Zoho Account ID set up with Zenduit for this child reseller, please contact support@zenduit.com to request one)
Finances
Currency
This field displays the currency on file for the reseller account. The selected currency will be used across all billing and invoicing processes within the portal.
Business Tax ID
Enter your registered Business Tax ID to ensure it is included in all generated invoices. This helps with tax compliance and financial recordkeeping for your organization.
Business Address
The primary address for your business. This may be used on invoices, contracts, and other official documents.
Billing Address
The address used for invoicing and financial records. You can check the “Same as Business Address” toggle to automatically copy the business address into the billing address fields.
Shipping Address
The address used for order fulfillment and shipments. You can check the “Same as Business Address” toggle to automatically copy the business address into the shipping address fields.
Contacts
Use this section like a rolodex, add any relevant personnel or contact information for future reference
Reseller > White Labelling
Your Customer Portal
Menu and Login Logo
Collapsed Logo/Icon
Login Page Colour
Button Colour
Email Sender (SMTP Settings)
Note: If you wish to send emails from your own domain (e.g., support@yourcompany.com), please contact support@zenduit.com. Our team will assist you in configuring your domain and setting up custom SMTP credentials.
Configure SMTP settings to send emails from your own domain, ensuring branded and reliable communication with customers while maintaining compliance and control over email policies.
Host
Password
Port
No Reply Email
Username
Reseller > Customer Management
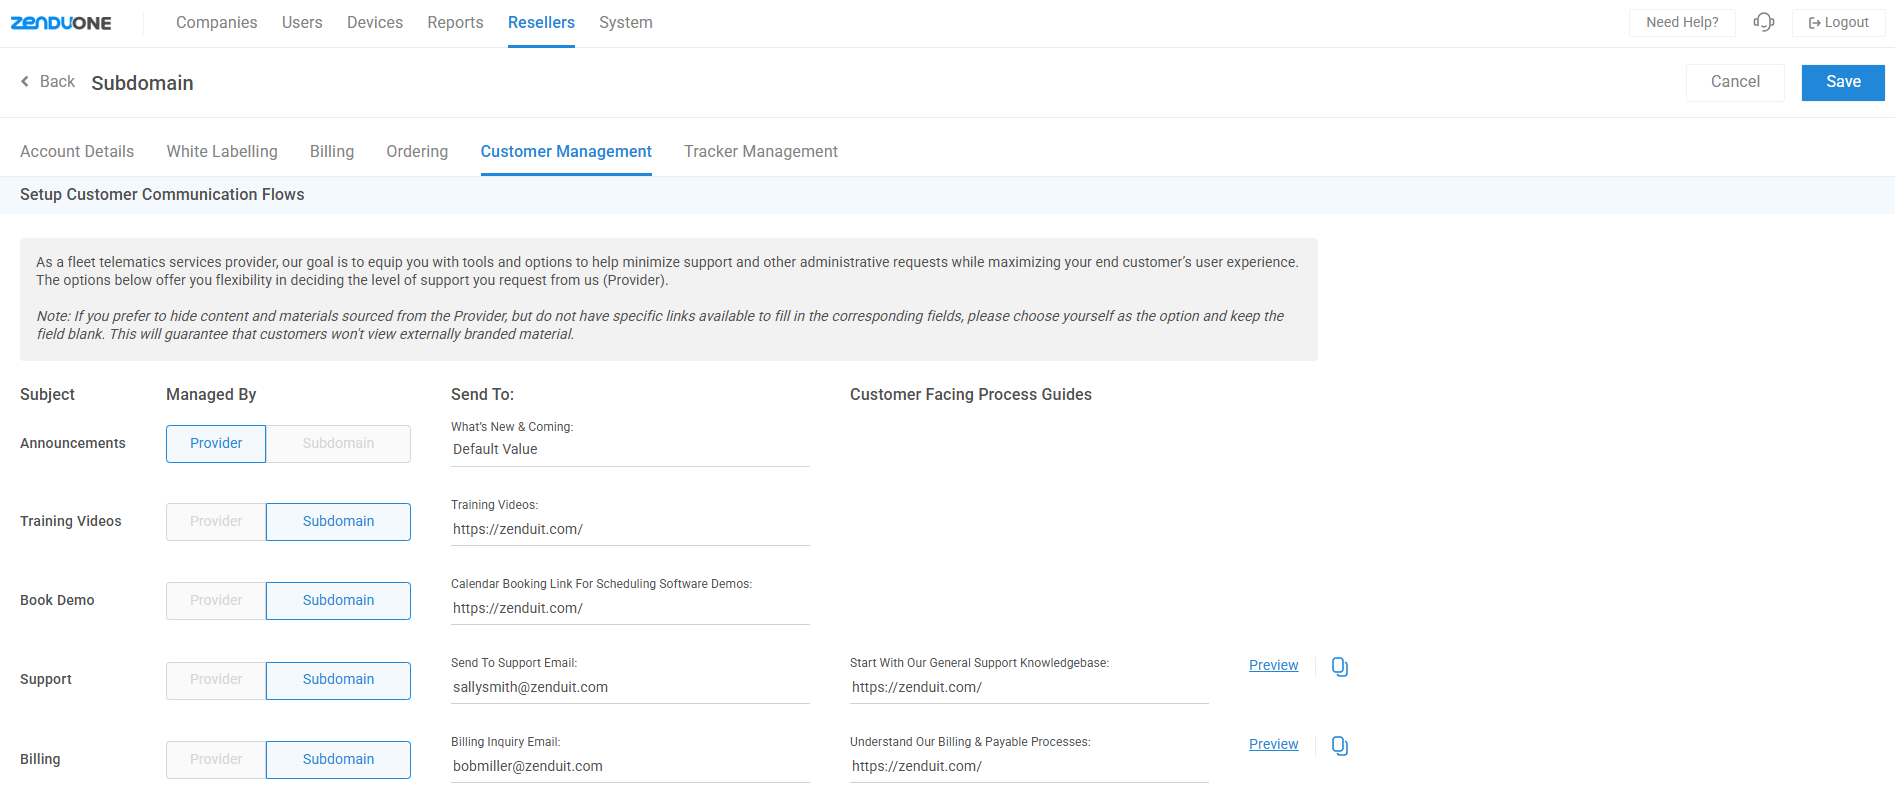
Subject
These are the various support and resource types that are available to ZenduONE End Customers on their portal.
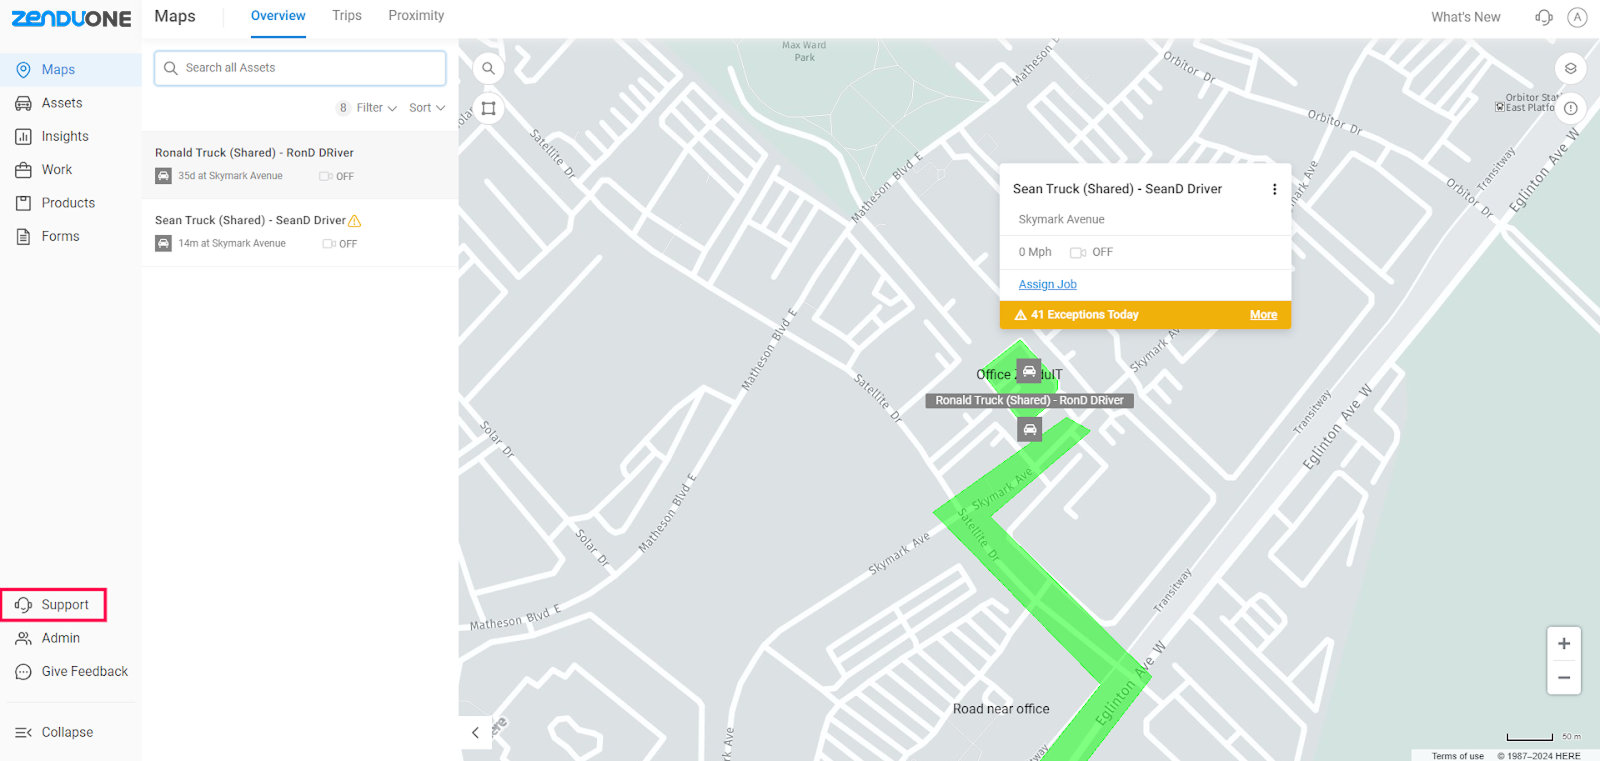
End Customer Access to Support Module managed by settings of “Customer Management” configurations:
Managed By
This toggle specifies who handles support inquiries from end customers, which is currently designated exclusively for management by the resellers.
Send To
For the first three subjects ("Announcements", "Training Videos", and "Book Demo"), these should be configured as URL links that direct customers to designated destinations upon selection.
For the sections below, please set up email addresses where inquiries should be directed. (For instance, support inquiries may need to be directed to a different email address or inbox than billing inquiries from customers.)
Customer Facing Process Guides
These fields allow you to link URLs to supporting documentation or resources that you wish to share with customers regarding the various subjects. (For instance, you can include the URL link to a PDF document detailing specific referral processes tailored for your reseller company.)
Note: If a URL is configured for the subject or support type, end users can access it via the "Learn More" hyperlink. If no URL is configured, the "Learn More" hyperlink will not be visible to customers.
Preview & Copy Icon
Preview - This option provides a view of the standardized form set for the specific subject or support type.
Copy Icon - Use this option to copy the form link, which includes your configured email address for that subject type. This enables you to easily share and streamline operational processes with external customers.
Note: The Preview and Copy Icon will only be available if the “Send To” email has been set for that subject or support type.
Reseller > Tracker Management
This section allows resellers to connect third-party telematics, camera, or IoT device platforms to the system using their own API credentials. By entering the necessary tokens, keys, and server details, resellers can enable direct communication between external device ecosystems and the ZenduONE platform.
Custom Device Integrations
Smartwitness
BeWhere
If you have a device that is not currently listed, please contact us to discuss integration options. Custom integrations may be subject to feasibility and could incur additional costs.
Editing/Viewing a Reseller
To edit or view the settings or configurations of a reseller, hover over the corresponding reseller row on the main "Resellers" module table and click to open this reseller record.
Companies Module
A customer cannot access ZenduONE until a company database has been created for them.
Within the "Companies" module, you can create or edit a database to manage users and devices that will affect the customer's tenant experience.
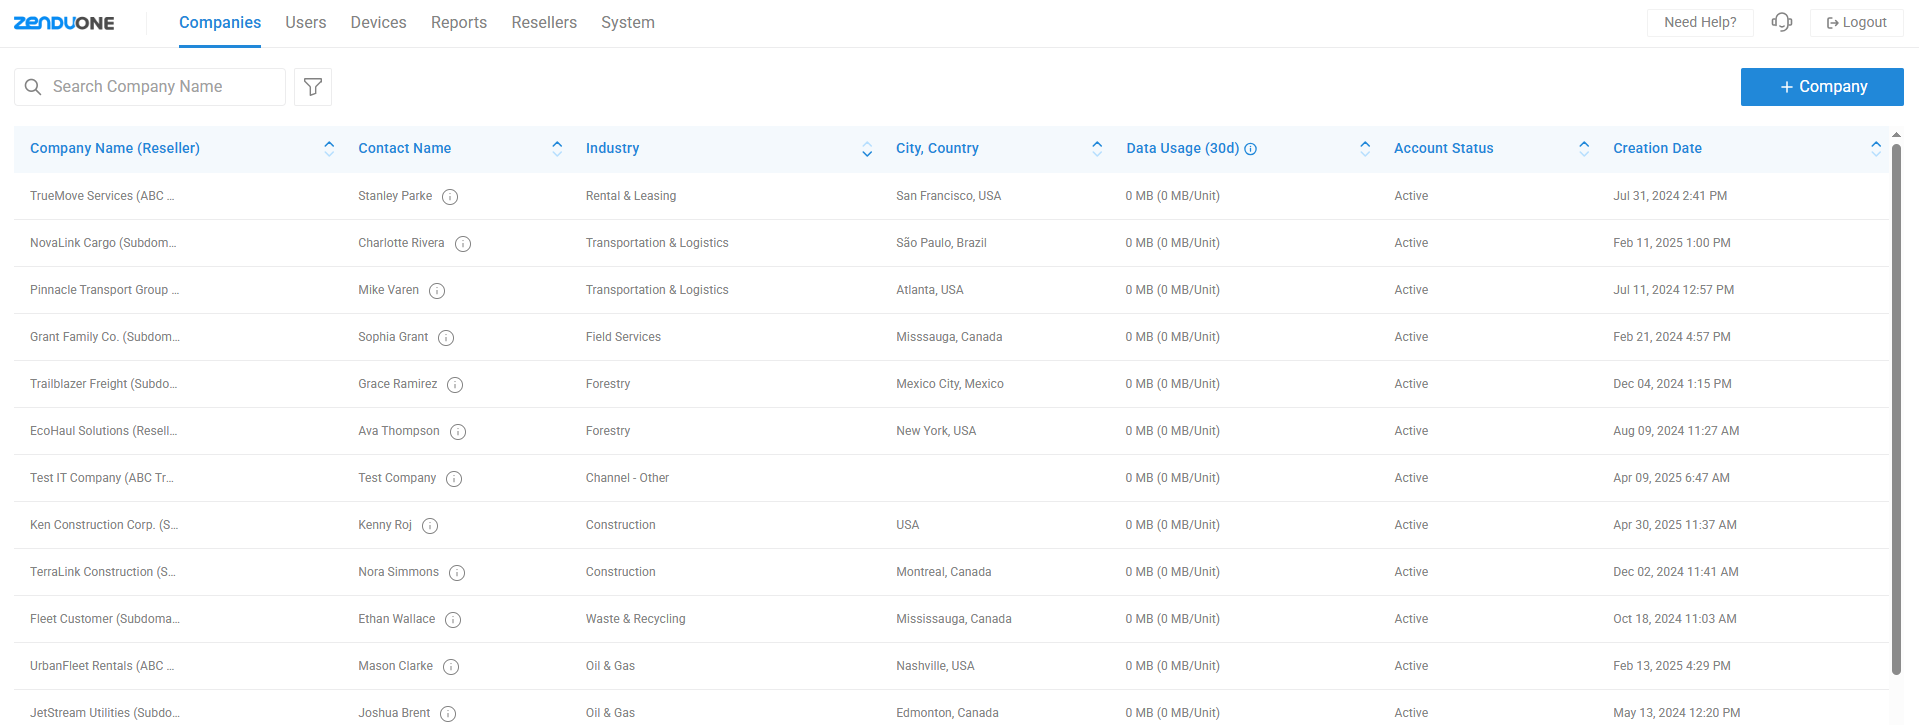
Note: You can consider a "Company" as a "Customer".
Adding a Company
+ Company – Add a new company
Company > Details
Enter information about the new company:
Company Details
Account Status
Company Name
Reseller
Industry
Main Fleet Contact Name
Main Contact Email
Main Contact Phone
Timezone
Notes
Shipping Details
Address
City
State
Postal
Country
Shipping Notes
Contacts
Use this section like a rolodex, add any relevant personnel or contact information for future reference.
Company > Devices
Note: The "Devices" tab for a Company account will only appear once the Company has been created. This is because devices can only exist within an active ZenduONE database, which is established when the Company account is generated.
Device Settings
Total Number of Devices
This is a count of all devices assigned to this database.
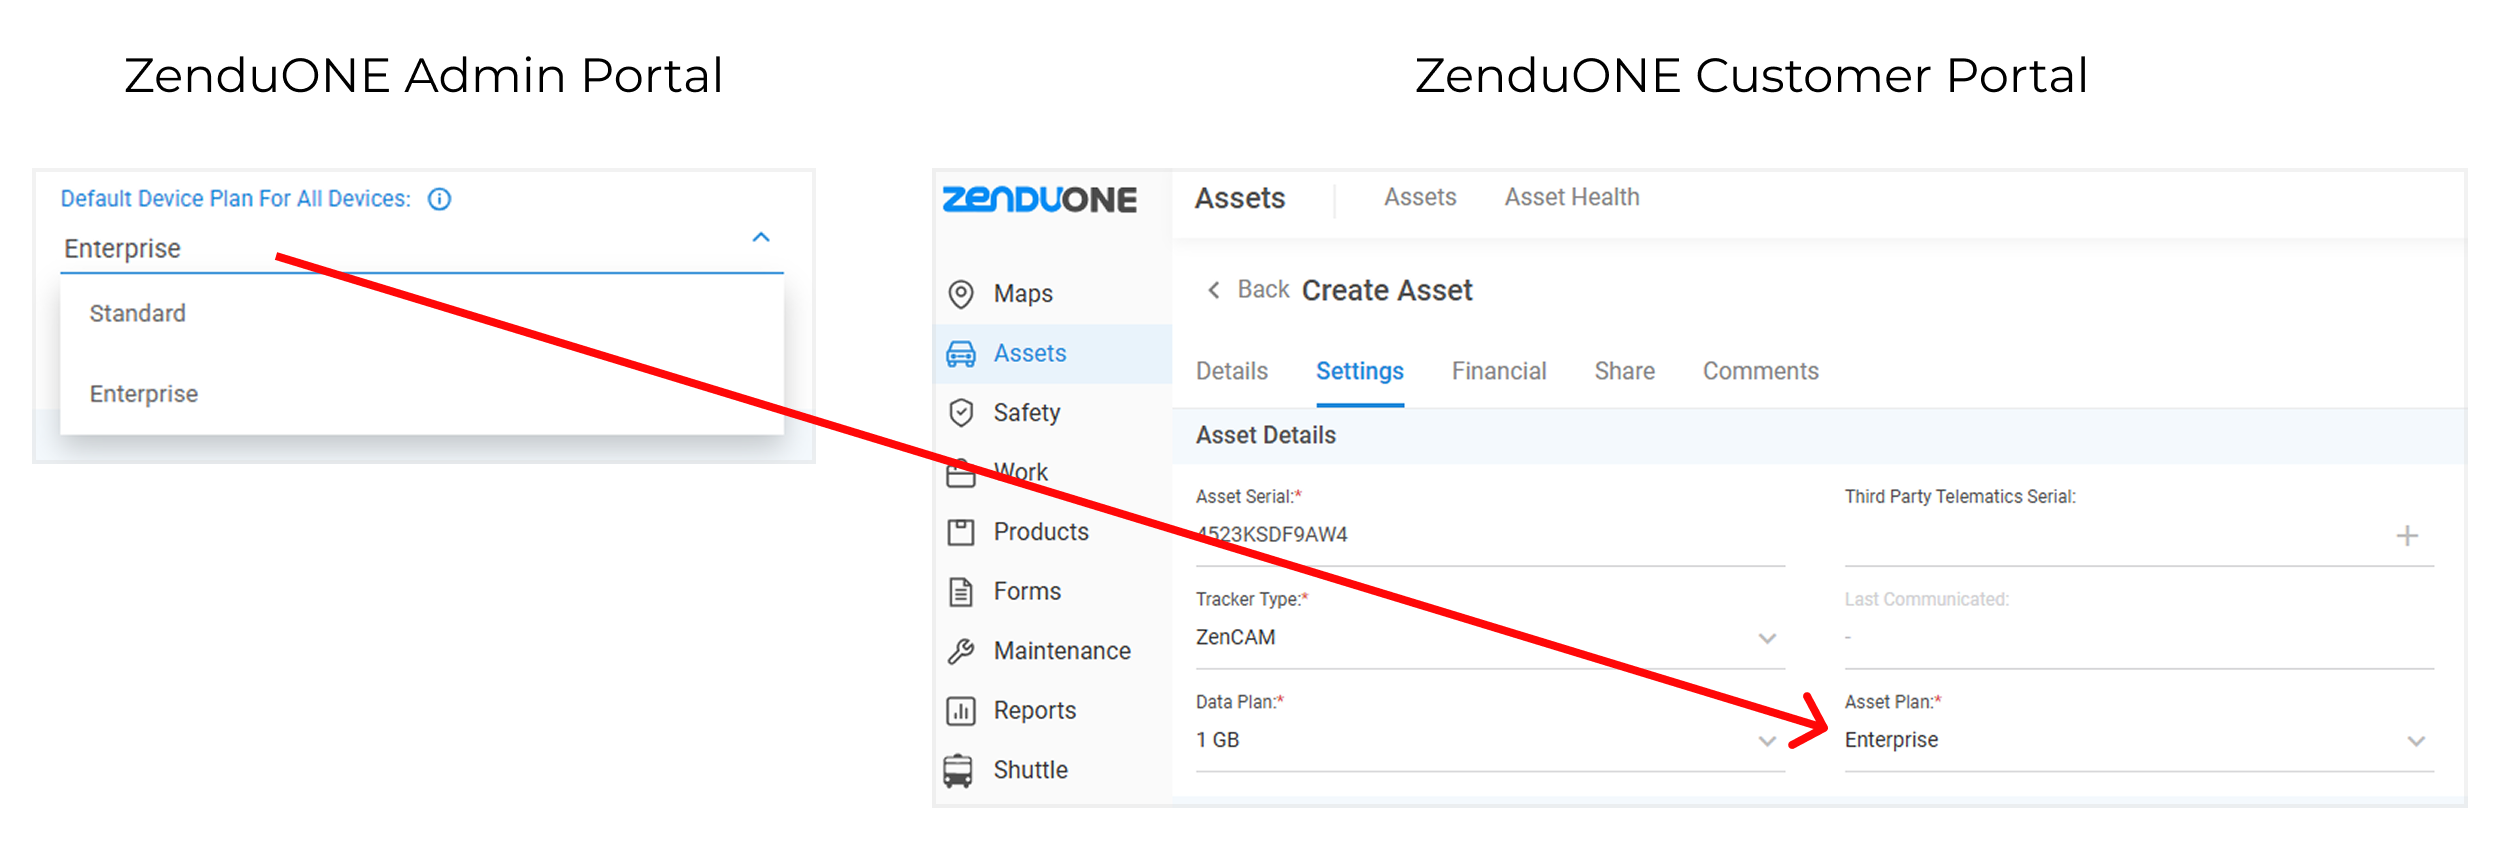
Default Device Plan for All Devices
The device plan selected here will automatically appear when a device is added through the ZenduONE customer portal. If only one plan is available for the tracker type, it will be assigned to the device by default. If there are multiple plans available, the default plan will be pre-selected, but customers can choose a different plan if needed. This helps make the process quicker and more consistent for customers.
Device Health Report
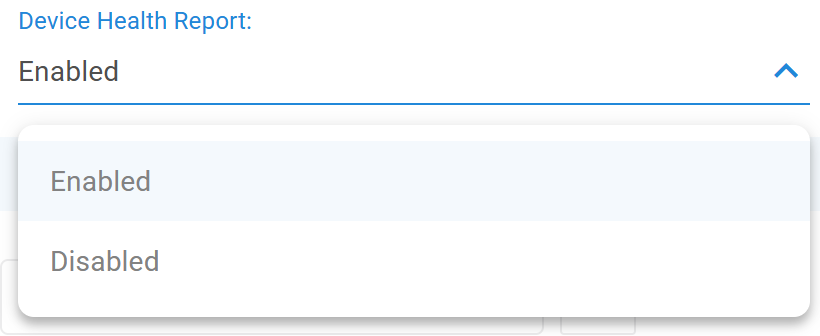
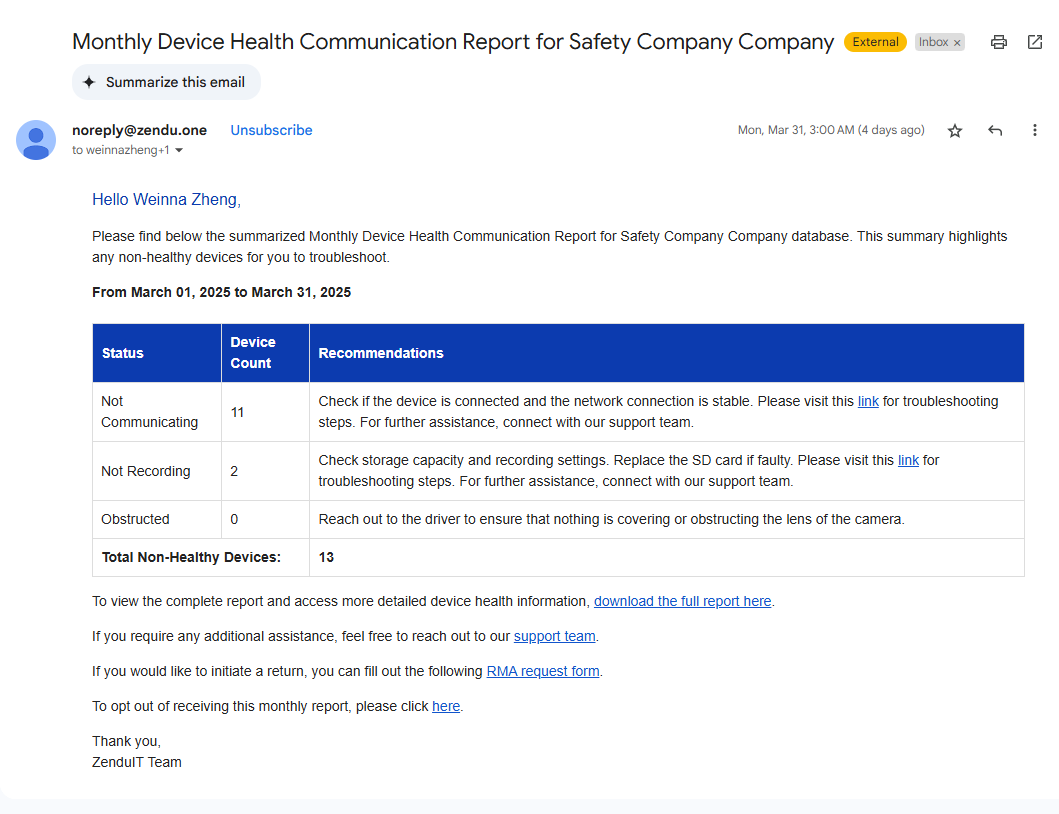
The report provides insights into devices that are actively communicating, not reporting, or disabled, along with troubleshooting recommendations. This helps ensure optimal device performance and proactive issue resolution.
Enable this to send a monthly summary of device health and connectivity status to all admins in the company database. The report is sent on the 1st of every month.
If any individual admin user wishes to opt out of receiving this monthly email, they can unsubscribe through the link in the email. This does not affect other admins in the company database.
Status breakdown:
Not Communicating: The device is not connecting to our servers. It appears as offline.
Not Recording: The camera may be online, but it is not storing any video recordings.
Obstructed: The camera is working, but the lens has been covered by something.
Example of emailed Report:
Device List
Shows details regarding the devices registered within this company or customer database.
Select on the dropdowns to instantly update the Device or Data Plan for the device.

Company > Plans
Software Settings
Software Version
Monthly SMS Limit (Database)
Enable Beta Version
When enabled, all users in the company database will have access to the beta version of ZenduONE, allowing them to explore new features and updates before the official release.
Software Plan
Here you can view the features included in your software plan, which are determined by your parent reseller or provider (Zenduit).
Company > Integrations
Here you can manage the integration of external platforms connecting to ZenduONE. Use the toggle buttons to enable or disable each integration.
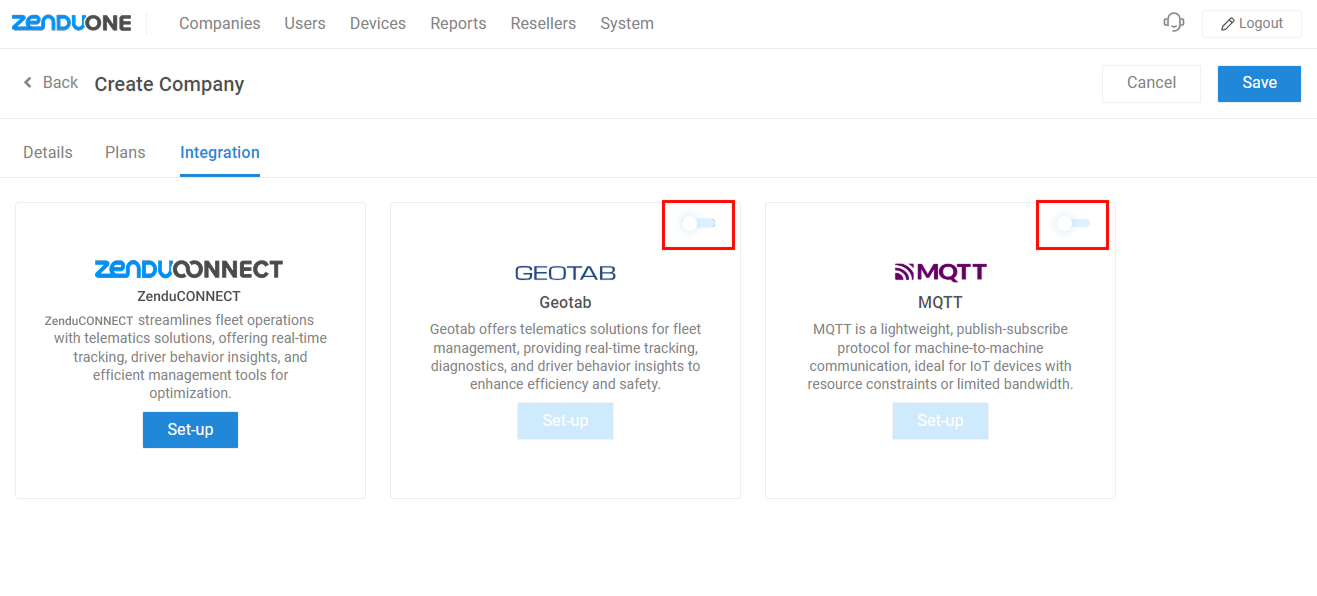
Note: ZenduCONNECT is enabled by default and cannot be disabled.
Integration Setup
Depending on the platform, the setup fields will differ. Some examples of setup fields:
ZenduCONNECT [Read-Only]
ZenduOne Account ID
Zoho Account ID
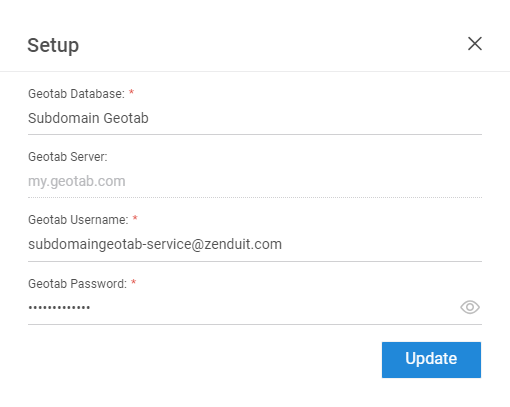
Geotab
Geotab Database
Geotab Server (non editable)
Geotab Username
Geotab Password
Below is an example of Geotab integration settings:
MQTT
MQTT Server
MQTT Username
MQTT Password
Editing/Viewing a Company
To edit or view the settings or configurations of a company, hover over the corresponding company row on the main "Companies" module table and click to open this company record.
Users Module
Within the "Users" module of the ZenduONE Admin Portal, you can create users within any company or reseller under your parent reseller umbrella. This provides enhanced control over your sub-resellers or customer companies, facilitating efficient support and assistance when needed.
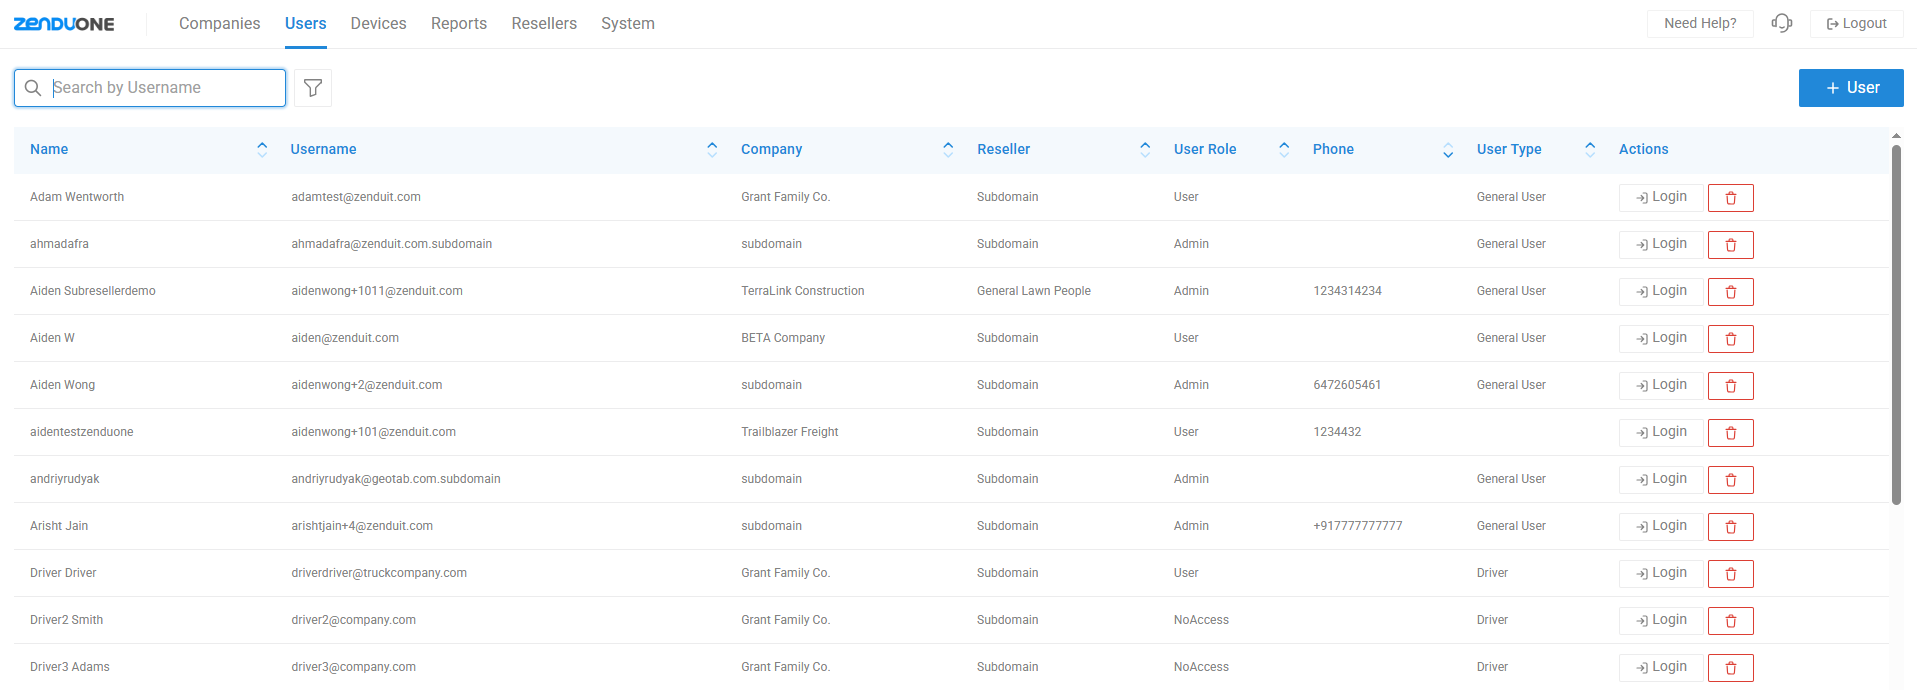
Adding a User
+ User – Add a new user
Enter information about the new user:
Username --> this should be same as email address
Email
Password
First Name
Last Name
Phone Number
Company
Reseller [Read-Only]
User Role
Admin (Full Access)
Grants full access to all features and settings within the platform. Admins can manage devices, users, configurations, and view all system data. This role is typically assigned to organization owners, system administrators, or managers who require unrestricted control.
User (Map & Insights Access Only)
Provides access to maps and insights, including the ability to view and interact with devices and live data. Users can perform regular day-to-day tasks but may have limited or restricted access to settings and user management based on specific permissions.
UserNoLiveView (Map & Insights access only with no ability to livestream)
Same access as a standard User — can view maps and insights — but cannot access live or real-time data such as live tracking or diagnostics. This role is useful for users who focus on historical data, analytics, or reporting without needing real-time visibility.
Viewer (Map access only with no ability to livestream)
A read-only role with access limited to viewing maps and reports. Viewers cannot interact with devices, make changes, or access live data. Ideal for roles like auditors, compliance officers, or supervisors who only need observation-level access.
NoAccess
A user profile that exists in the system but has no access to the ZenduONE portal. This role is intended for users like drivers or field personnel who are logged in the system for tracking, assignment, or reporting purposes but do not require login access or system interaction.
User Type
General User
Supervisor
Driver
Technician
Passenger
End Customer
User Types help classify and organize users based on their role or function within the system. They are used for categorization only and do not control or limit access permissions.
Measurement
Metric
Imperial
Groups
Use the Groups field to assign a user to one or more organizational groups. Groups help organize users based on departments, locations, teams, or other logical segments. In addition to filtering and reporting, groups also control visibility—users can view only the devices that belong to the same group(s).
Auto-Generate Password and Send Email with Login Details to User
Enable this option to automatically generate a secure password and send the user an email with their login credentials.
If this option is not selected and a password is set manually, the system will not send an email. In that case, you will need to share the login details with the user manually.
Editing/Viewing a User
To edit or view the settings or configurations of a user, hover over the corresponding User row and click the pencil icon located on the right.
Logging into ZenduONE as a specific User
In the admin portal, you have the ability to log in to ZenduONE as a specific user directly, without requiring end-user credentials. This grants immediate access for investigating or reviewing specific database or user activities as needed.
To log in as a specific user, hover over their row and click the blue arrow icon located on the right side of the table.
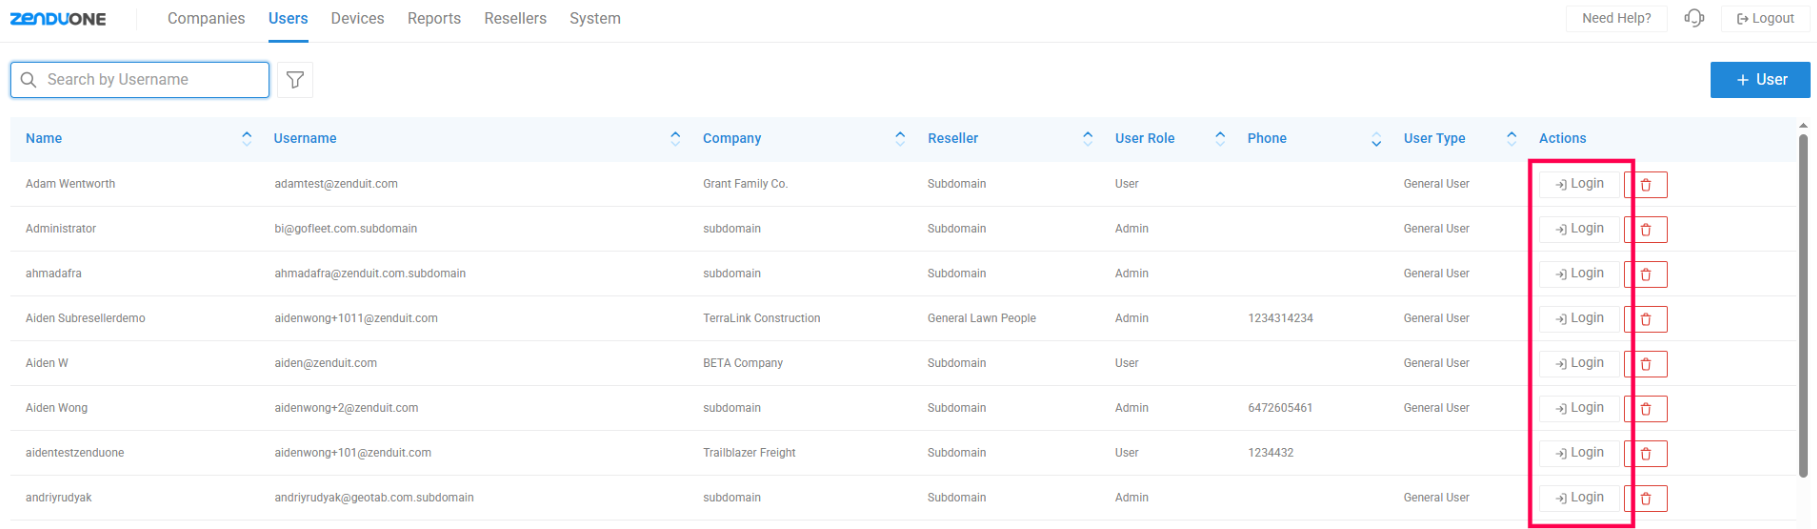
When a user can't log in
Most login problems come from the wrong address, an old browser session, or a reset email going to an inbox the user can't open.
Check the address. Fleet users log in at https://zendu.one/login. The admin portal is at https://admin.zendu.one/login.html. The old traxadmin address is deprecated.
Test in a private window. After a password reset, open a private (incognito) browser window and log in there with the user's email and new password. If it works there, the account is fine and the old browser session is the likely problem. Clear that browser's cache and cookies, then log in again.
Check the role. A user with the NoAccess role exists but cannot log in to the portal (see Adding a User above). Change the role if the user needs portal access.
Reset email not arriving. The username is the user's email address, so reset emails go to that inbox. If the user can't open it, ask your account administrator to set a new password from the user's row (pencil icon, see Editing/Viewing a User above). A password set by hand is not emailed, so the administrator must pass it on securely.
Two-factor code issues. See Troubleshooting Two Factor Authentication 2FA Issues on ZenduOne/Trax.
If the user still can't log in after these steps, contact Support with the username and the address being used.
Devices Module
The devices module allows you to view and manage the settings, configurations, and plans associated with each device, ensuring comprehensive control over device management.
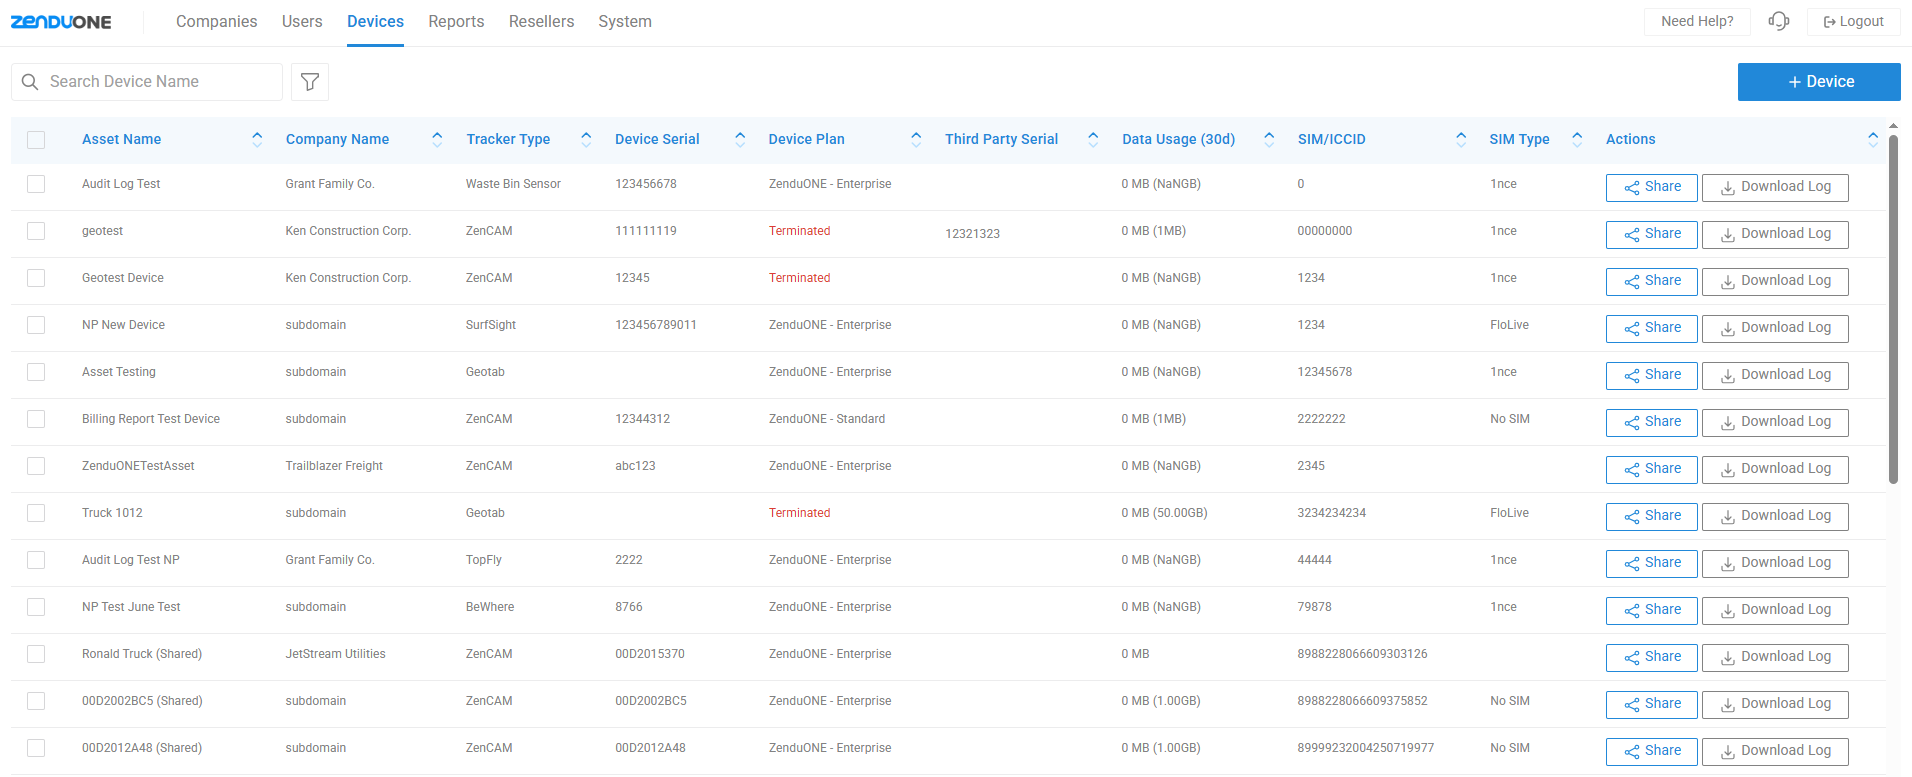
Devices Overview
Actions
Share
Share device details and location activity with another Database.
Note: The shared to database will have permission to edit device configurations and view activity.
Log download
Excel export of device activity
Adding a Device
+ New Device – Add a new device
Enter information about the new device:
Details
Asset name
Tracker Type
Company
Groups
Third Party Telematics Serial
Device Serial Number
SIM Type
SIM ICCID
Device Plan
Custom
ZenduONE - Standard
ZenduONE - Enterprise
Suspended
Terminated
Data Plan
Note: If “No SIM” is selected for <SIM Type>, then there will be no SIM ICCID field to populate.
Camera Feature Management (Only Editable when ZenduONE - Enterprise is selected as Device Plan)
Video Events Limit (Daily)
Livestream Limit
Trip Hyperlapse (Snapshot Interval)
Allowed Number of Channels
Camera Obstruction Detection
Managed Video Coaching Service
Extended Video Request Length (8 Minute)
Driver Facial Recognition and Assignment (Facial AI)
Device Plan Selection
Here you can view the features included in your selected device plan.
Editing/Viewing a Device
To edit or view the settings or configurations of a device, on the corresponding Device row, select “Edit” under the Actions column.
In this section, you will find four sections - two of which mirror those found in Device creation ("Details" and "Device Plan Selection"). Below these, you will encounter two additional sections:
Note: The timeframe displayed in both the Device Summary and Device Log sections is determined by the date range selected in the Device Log section.
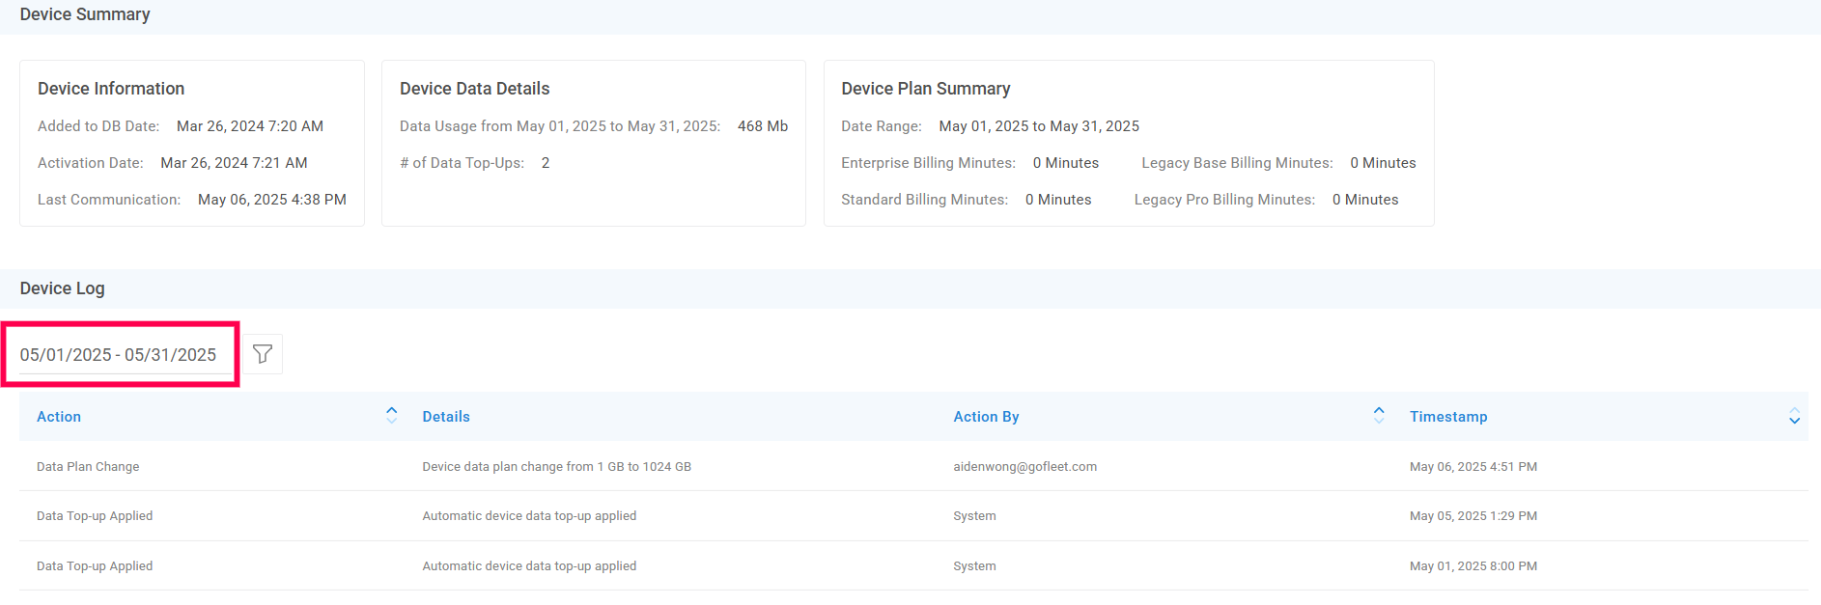
Device Summary
Device Information
Added to DB Date - Date & Time that Device was added to database
Activation Date - Date & Time that the Device first came online
Last Communication - Date & Time of last device communication
Device Data Details - Data Usage (if available depending on SIM Provider)
Device Plan Summary - Duration that the device remained on each device plan
Device Log
The device log provides a comprehensive record of device activities and changes over time, essential for troubleshooting, monitoring performance, auditing modifications, and analyzing usage patterns.
Bulk Editing Devices
To edit multiple devices at once, select the devices you want to edit directly from the devices table, then hit "Edit Selected Devices".
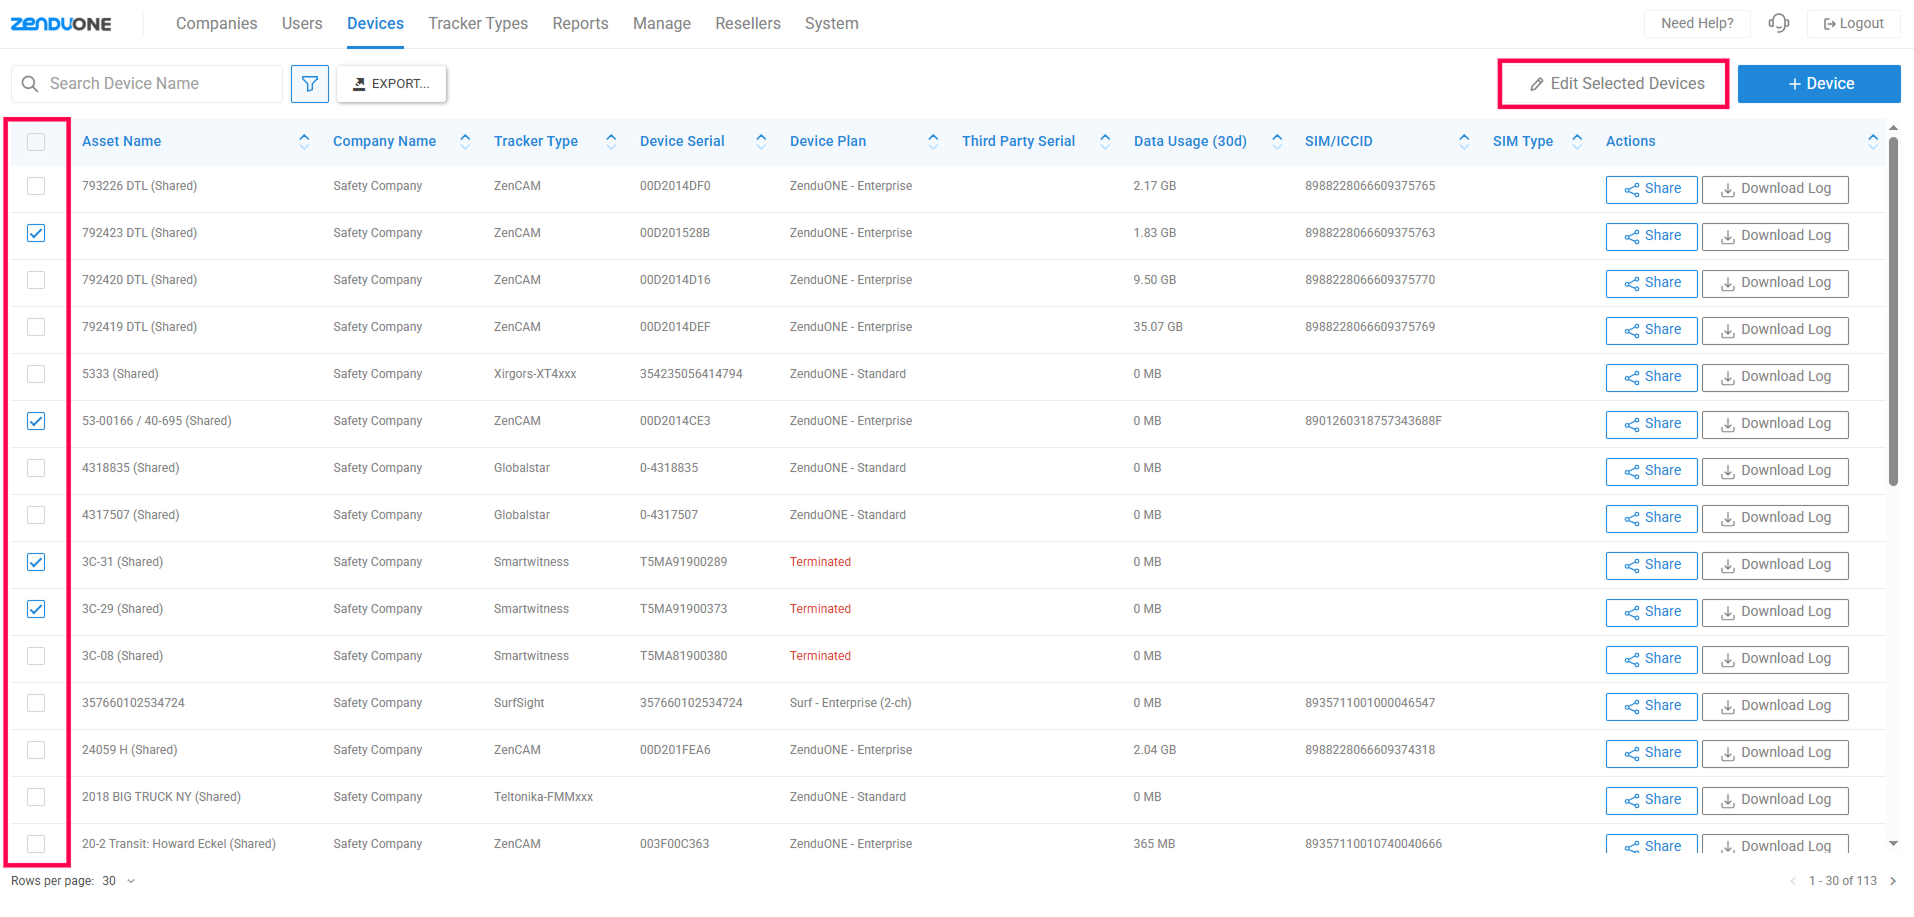
In the popup, set the fields you want to update for the selected devices.
Note: You can only select groups after a company has been selected.
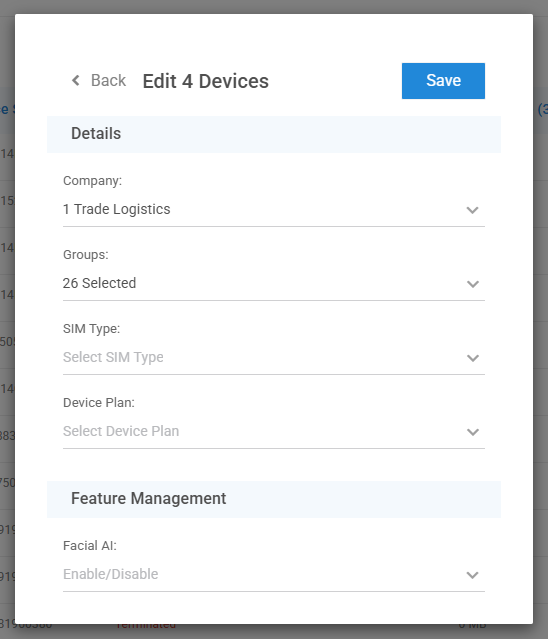
Hit "Save" to update all the selected devices with the new fields you set.
Reports Module
The reports module provides analytics that enable detailed insights into operational performance, user activity, and device utilization. It empowers administrators and resellers to optimize workflows and make informed decisions based on key metrics and trends.
Reports available:
Device Report
#
Database
Customer
Group
Tracker Type
Device Name
Serials
Device Last Communicate
Date Device Add
Activation Date
Comment
Billing Status
Audit Log Report
List of system actions. [Table View only - no excel export] Use Date Picker to view historical actions.
Action
Username
Date
Recordings
List of video exceptions. [Table View only - no excel export]
Removed Device
Provides a table and export of devices removed from the databases
#
Database
Customer
Tracker Type
Device name
DRID
Date Device Add
Removing Date
Scheduled Reports
Ability to schedule the following reports:
Device Add
Device Add & Removed
Device Removed
Devices Consumption
Quality
Quality
Customer
Reseller
Camera Issues
Open Tickets
Was this helpful?
Still need help? Ask the team