ZenduONE Dashboard - Maps Module
Written By Support Team
The Maps tab in ZenduONE provides a comprehensive, interactive view of your fleet's locations and movements. It allows fleet managers to monitor vehicles in real-time, review historical routes, and analyze geographic location data to improve operational efficiency. With features like customizable map views, overlays, detailed asset status and driver calling the Maps module helps streamline fleet management, optimize routing, and respond quickly to incidents.
Maps > Overview
The Overview section displays the activity and location of all assets in your fleet. Assets can be accessed both from the Assets List and directly on the Map View.
The Assets List displays all vehicles and devices with status indicators:
Vehicle Icon: Represents vehicle status.
Circular Icon: Vehicle is active.
Square + Blue Icon: Vehicle is either:
Idle (vehicle on, device active)
Stationary (vehicle off, device active and communicating)
Square + Grey Icon: Vehicle off, device offline
Red Icon: Vehicle actively triggering an exception
Vehicle Icon | How it Looks | What it Means |
 | Square + Blue Icon | Vehicle is either:
|
 | Circular + Blue Icon | Vehicle is active and moving |
 | Square + Grey Icon | Vehicle off, device offline |
 | Red Icon | Vehicle actively triggering an exception |
Device Icons: Show the status of devices attached to the vehicle (e.g., cameras, asset trackers, beacons).
Search, Sort, and Filter Options:
At the top of the Assets List, you can search for assets, sort by parameters, filter, and set Custom Views.
For instructions on creating a Custom View, see: Users Overview > User Screen Overview > Filters and Custom Views.
Navigating the Map View
Top Left Corner
Search Button: Search for any address or existing location on the map.
Create Location Button: Opens Admin > Locations > Create Location, allowing you to add a location to your database.

Top Right Corner
Map Options Menu: Customize your map view.
Map Base: Switch between Modern, Standard, and Satellite views.
Overlay Options: Add/remove overlays such as:
Road Restrictions
Traffic
Incidents
Weather
Locations
Fleet Clustering (groups vehicles by number in a geographic area)
Custom Maps: Overlay a custom map application, e.g., ArcGIS Maps, added via Admin tab.
Info Menu: Displays a legend of map icons and their meanings.
Tip: Clicking on a location overlay provides additional information or editing options.
Asset Clusters
Asset clusters group multiple vehicles in a geographic area. Hovering over a cluster displays a list of all assets within it. Clicking an asset opens its details page.
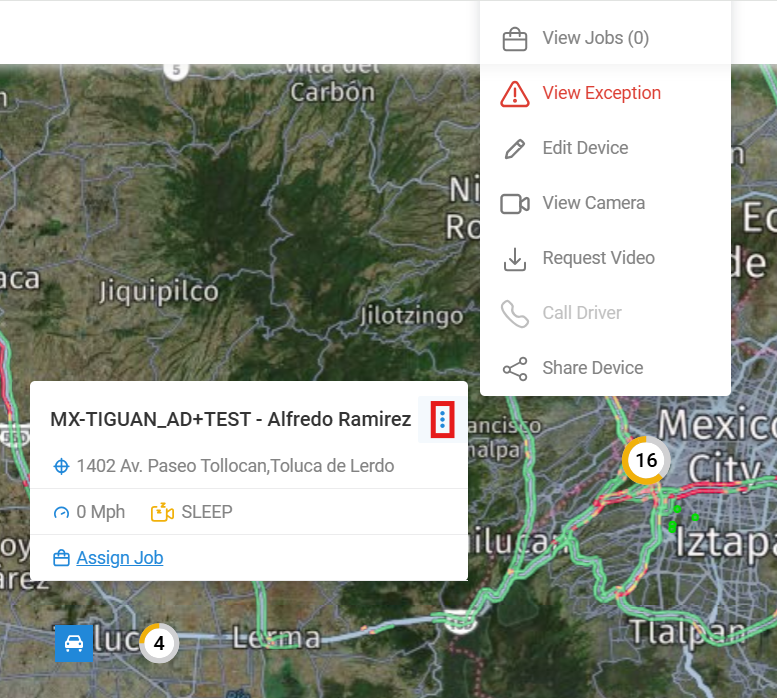
Asset Hover Details:
Hovering over a vehicle or device shows:
Real-time location
Speed
Camera status
Number of exceptions today
Option to assign the asset to a job
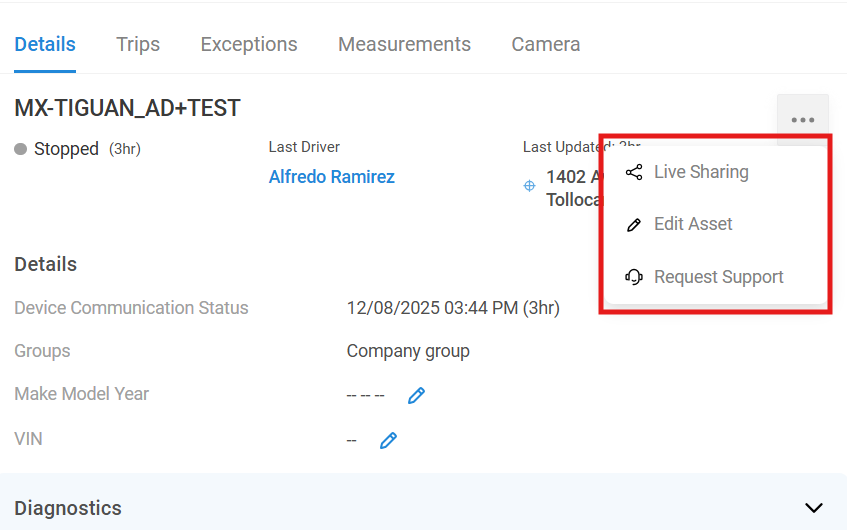
Asset Actions Menu (click menu corner on asset):
View Device: Zooms the map to the device
View Trips: Opens Asset Details > Trips
View Exceptions: Opens Asset Details > Exceptions
Edit Device: Opens asset edit page in Assets module
View Camera: Opens Asset Details > Camera
Request Video: Opens Asset Details > Camera > Historical > Request Video
Share Device: Opens Share tab on asset page
Right-Click Menu
Right-click anywhere on the map to access quick actions:
Find Address: Displays the address of the selected area
Create Location: Opens Admin > Locations > Create Location
Show Street View: Opens Google Maps Street View for the selected location
Show All: Zooms out to display all assets
Find Nearby Assets: Drops a pin and sorts the asset list by distance from the pin
Find Proximity: Opens Maps > Proximity for the selected location
Dispatch Here: Opens Work > Jobs > Create Job configured for the selected location
Asset Details
When you click on an asset from the Maps tab or the Assets List, you’ll be directed to the Asset Details page. This section provides in-depth information about the selected vehicle, including its Trips, Exceptions, Measurements, and Camera data (both historical and live).
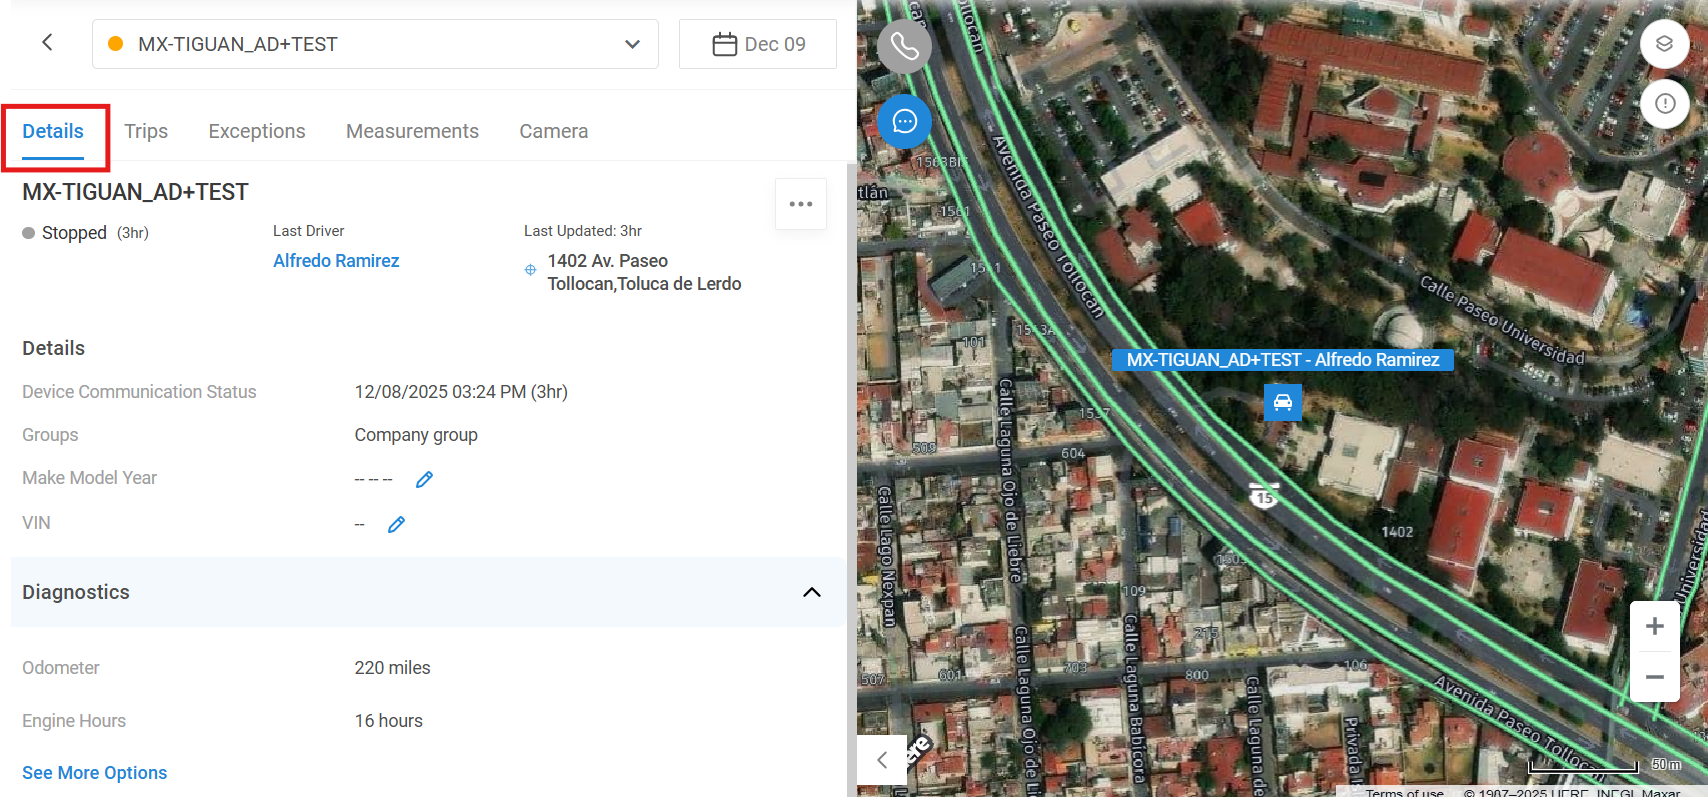
Asset Details > Detail
The Detail section provides a complete snapshot of your selected asset, allowing you to view all critical information in one centralized view. This enhancement was developed in response to customer feedback regarding scattered asset data.
The Detail view gives you a clear, real-time overview of the vehicle’s operational and diagnostic status.
Here’s what you can view in this section:
Current Vehicle Status: Shows whether the asset is moving, idling, or stationary.
Assigned Driver: Displays the name of the driver currently assigned to the vehicle.
Last Update & Communication Time: Indicates when the device last communicated with the platform.
Current Location: Displays the vehicle’s real-time geographic location.
Assigned Group(s): Shows which group(s) the asset belongs to within your organization.
Vehicle Details: Includes information such as make, model, and year.
Diagnostics Overview: Highlights key diagnostic information such as fault codes, fuel levels, and sensor readings (if available).
Faults and Exceptions:
Displays active fault codes and exceptions associated with the vehicle.
Each fault or exception can be selected to view more detailed information or to take action directly.
Device Issues and Support:
If a device is not communicating or recording properly, the system highlights these issues directly within the Detail view.
You can click the Contact Support link, which redirects you to the Zenduit Support Form for troubleshooting assistance.
This consolidated view helps fleet managers and administrators quickly assess asset health and take immediate action — whether that’s reviewing a fault, responding to an exception, or contacting support for device issues.
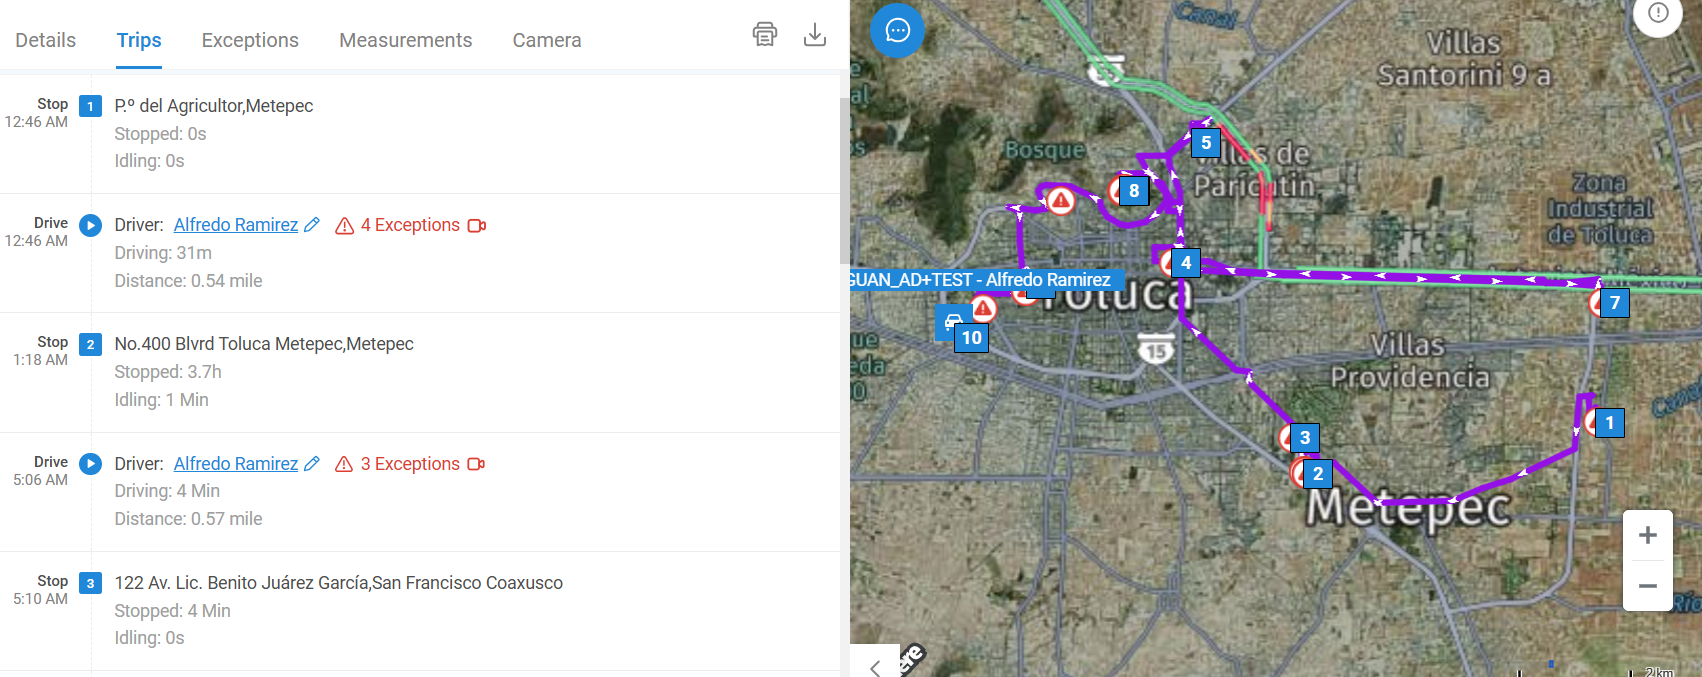
Asset Details > Trips
The Trips tab displays all trips taken by the vehicle for the selected date. Each trip is grouped by day, with today’s date selected by default. Each entry includes details such as total stops, exceptions, idle time, and total distance driven.
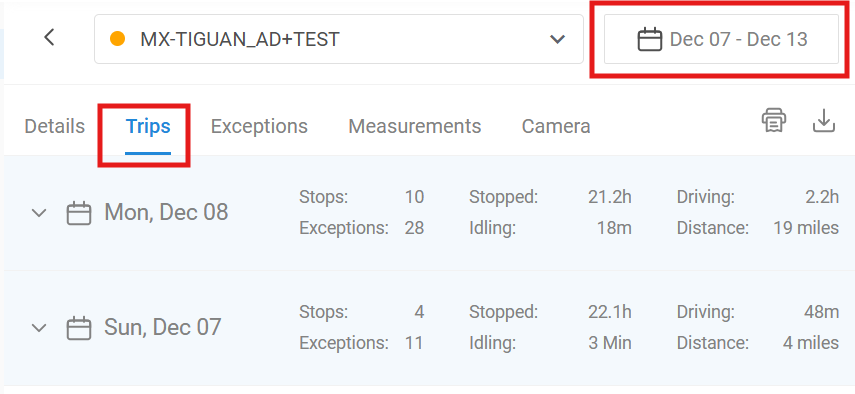
How to Navigate the Trips Tab:
Open the Dropdown:
Expand the dropdown list to view all Stops and Drives for the selected date. The map on the right displays the corresponding routes.Stops show the total stopped and idling time.
Drives display the assigned driver, driving time, and distance traveled.
Assign Drivers:
Assign or reassign a driver directly to a Drive entry.
View Stop Location:
Click any Stop to view its exact location on the map.
View Drive Details:
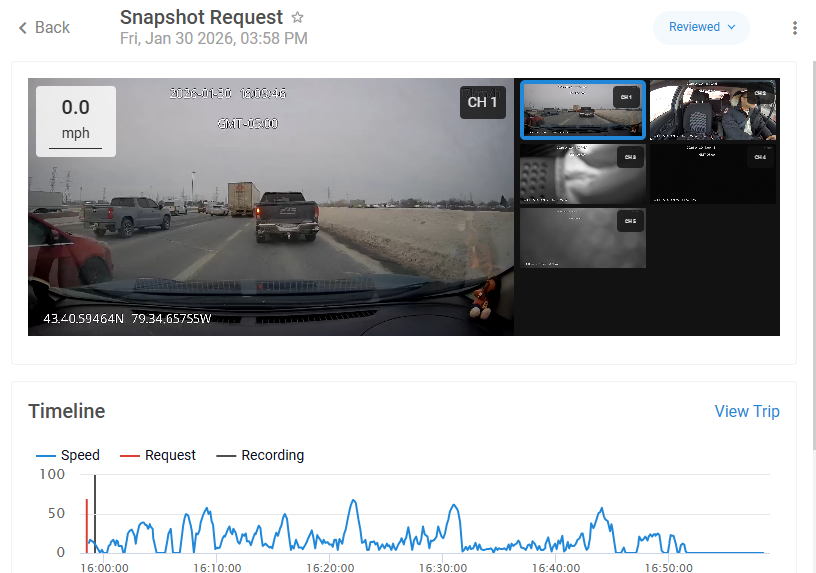
Selecting a Drive allows you to view corresponding camera footage. Clicking “Play” triggers a Hyperlapse playback. You can also view a speed graph of the trip, with exceptions indicated by red warning icons. Hover over an icon to identify the type of exception.

Scrub Through Video:
Click on any part of the speed graph to jump to that point in the video. A green dot appears on the route map, showing the vehicle’s location at that exact moment.
Request Video or Location Details:
Click anywhere on the route to see the address or request footage for that specific time and location. Selecting Request Video redirects to Camera > Historical > Request Video.
Note: A trip is recorded when a vehicle travels faster than 5 km/h for a distance greater than 100 meters. It ends when the vehicle remains stationary for more than 3 minutes.
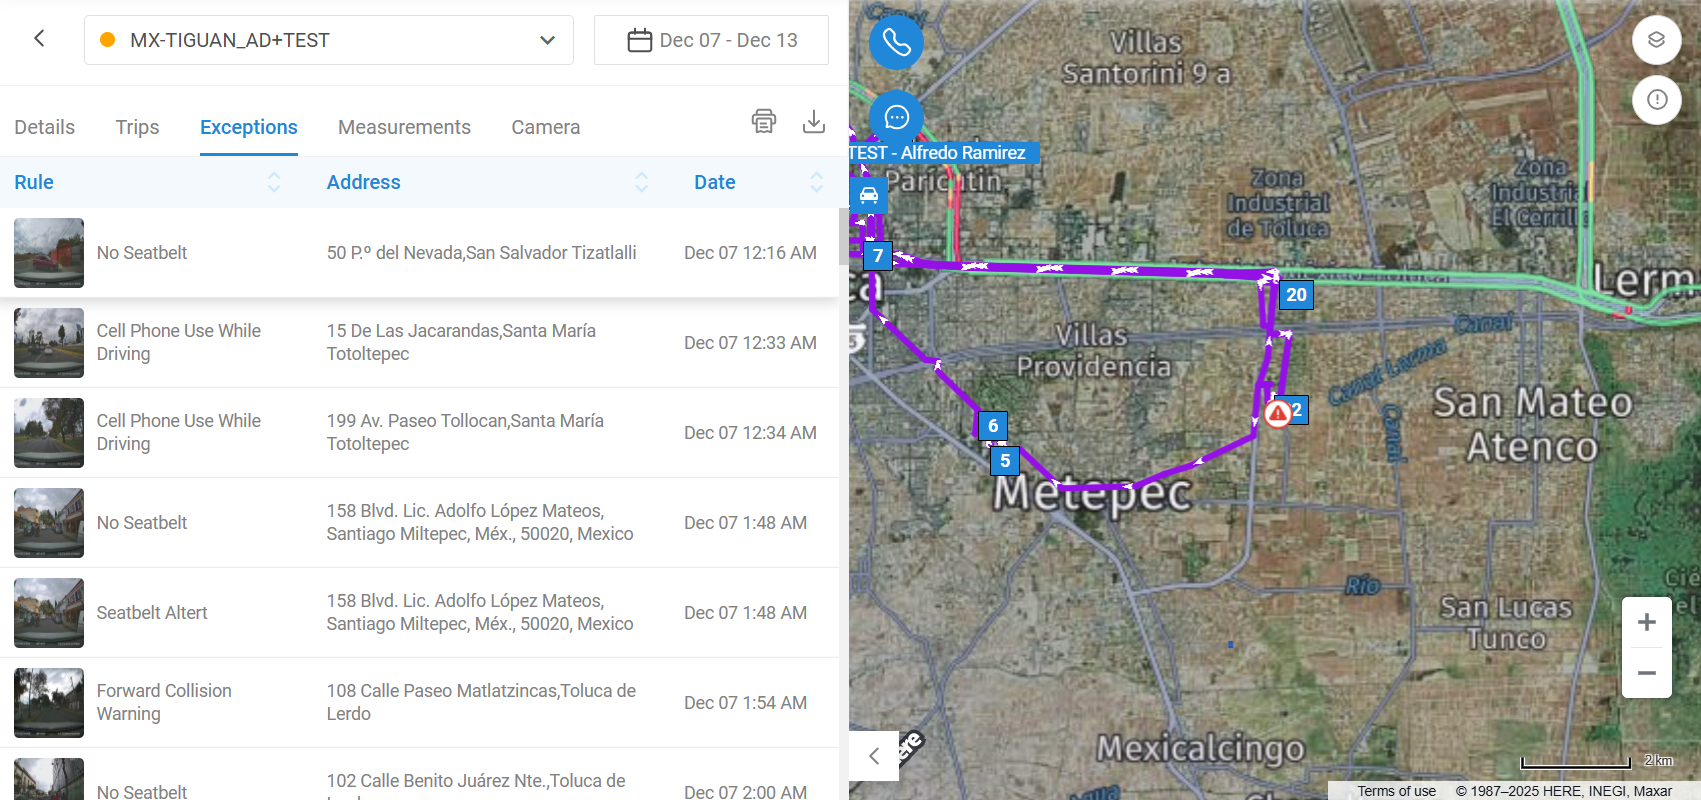
Asset Details > Exceptions
The Exceptions tab lists all exceptions recorded for that specific vehicle within the selected date range. Hovering over an exception highlights its location on the map, and clicking it provides further details.
AI Overlays on Exceptions
We can also have AI overlays on camera-related exception videos to provide transparency into how the camera makes decisions and triggers alerts. Unlike standard video playback, our system "showcases how the camera thinks" by projecting the AI's decision-making process directly onto the footage.
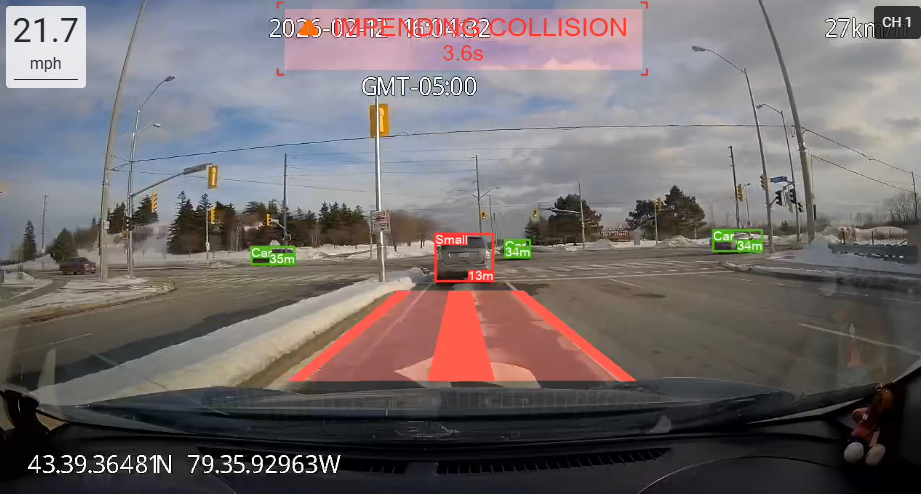
AI Overlay Visualization
What It Does: Displays real-time AI data (e.g., time-to-collision or fatigue detection) as an overlay on exception videos.
End User Benefits: Provides immediate context for safety events without needing to cross-reference data logs.
Overlay Toggle Control
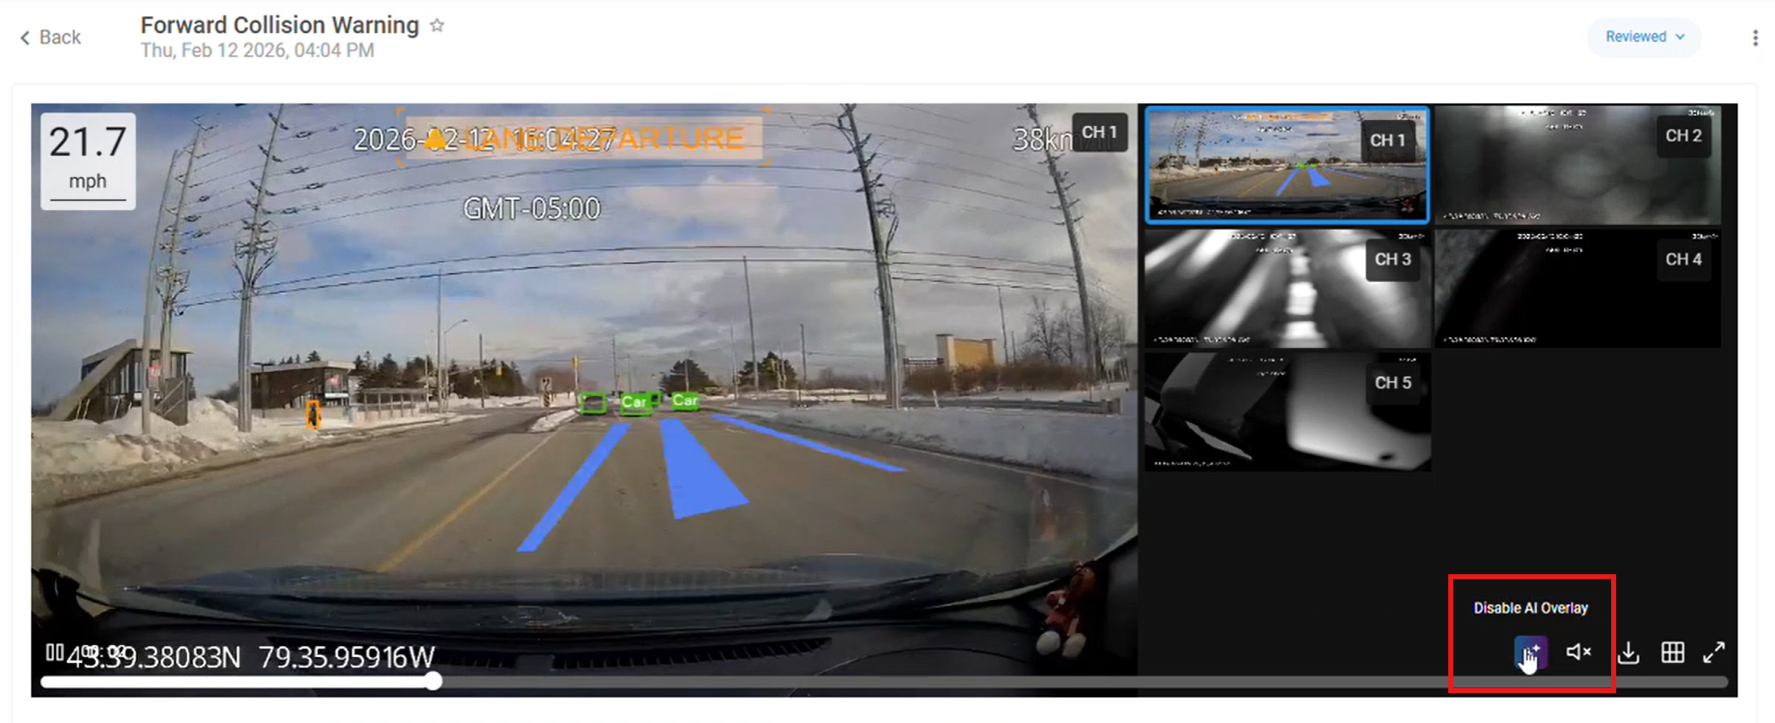
What It Does: Provides a simple toggle switch to enable or disable the AI overlay view during playback.
End User Benefits: Allows users to view the raw, unobstructed footage whenever the overlay is not needed.
Note:
This tab functions similarly to Safety > Exceptions. However, while the Safety section organizes exceptions by review status (Needs Review, Reviewed, Coached, etc.), the Asset-level Exceptions tab consolidates all exceptions related to this particular vehicle in one place.
Note: If you need to share an exception video externally, you have two options. You can download the video directly from the system, or you can use the link provided under the Share button. By copying and sending this link to any external user, they can download the video on their end without requiring access to your dashboard. This ensures secure sharing while maintaining full control over your platform access.
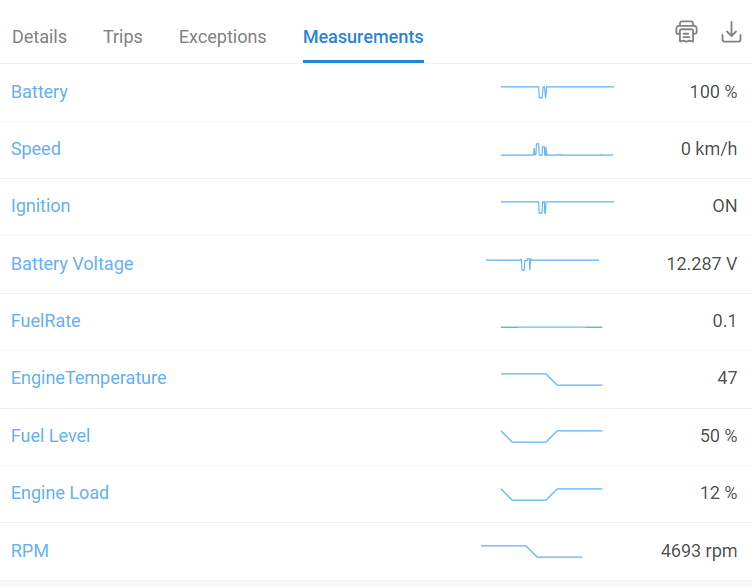
Asset Details > Measurements
The Measurements tab displays real-time sensor data from connected asset tracker devices. This may include readings such as temperature, humidity, and battery levels.
The displayed measurements represent the latest values transmitted by the device.
For historical readings, click an entry to open a chart view. From there, you can download the data in Excel format for analysis.
Asset Details > Camera > Historical
In this section, you can request and view historical camera footage from a specific date and time.
To request a video:
Click Request Video in the top-right corner.
Use the calendar to select a date — days with available footage are marked with green arrows.
Once selected, a preview appears, showing the earliest available footage from that day.
Selecting Footage:
In the graph at the bottom, choose a time with available recordings (indicated in green).
Select the camera channel (view angle) you want to extract footage from.
Click Start Streaming to preview the footage.
Submitting a Request:
Select the video type – choose between Video Footage or Hyperlapse (20s snapshots).
Set the duration of footage.
Click Send Video, name your request, and specify recipient email(s).
Click Save to complete.
Asset Details > Camera > Live
The Live tab enables real-time video streaming for any vehicle equipped with a ZenduCAM device.
Camera States:
Offline: Camera inactive. It turns on automatically when the vehicle powers up.
Sleep Mode: Camera is temporarily inactive but can be woken remotely.
Click Start Streaming to wake the camera. This process takes about 2 minutes.
(Image 12: Example of camera waking up process indicator)
Online: Camera actively streaming.
Stream Controls:
Stream Timeout: Defines how long the live stream plays before auto-refreshing (e.g., 30 seconds per session). Click Refresh Stream to reload.
Total Stream Time Remaining: Displays remaining streaming time based on your plan.
Video Recall Request
When submitting a video request, you can select an extended time range to retrieve a longer footage segment in a single request. This allows for better visibility into events by capturing additional context before and after the selected timestamp.
Longer footage requests are helpful when:
Investigating safety incidents
Reviewing driver behavior trends
Validating event triggers
Gathering complete context around harsh driving events
To request video:
Navigate to the asset or event associated with the recording.
Select the option to request video footage.
Choose the appropriate date and timestamp.
Adjust the time range to capture sufficient footage before and after the event.
Submit the request.
Selecting a broader time window helps reduce the need for multiple consecutive requests and provides a more comprehensive view of the situation.
If additional context is required beyond the selected range, separate requests can still be submitted accordingly.
Daily Uploads (Wi-Fi Upload) Feature
Daily Wi-Fi Uploads allows your dashcam to automatically upload all recorded footage to the cloud whenever the camera connects to a designated Wi-Fi network—such as a warehouse, yard, or parking facility. This is especially useful for fleets that return to a central location at the end of the day.
When enabled, recordings are uploaded in 30-minute batches and can be viewed under the Daily Uploads section in the Live App view of your camera. You can easily navigate through each day and access all available footage.
How to Enable Daily Uploads
To activate this feature, contact your solutions provider. They can enable it on your account and help configure the Wi-Fi network your camera should connect to. Storage can be handled through our cloud or your own storage option (with additional integration if required).
Text-to-Speech (TTS):
In the top-left corner of the map view, click the TTS button to open a panel where you can send real-time voice messages to the driver.
Note: Text-to-Speech is available only on ZenduCAM devices.
Driver Calling
The Driver Calling enables fleet managers and authorized personnel to make direct voice calls to drivers through the ZenCam system. This integration allows seamless communication without relying on separate devices or phone calls. Calls can be initiated from the ZenCam dashboard and from the ZenCam Fleet App, ensuring quick and efficient communication while drivers are on the road.
This feature currently supports
English
Spanish
Arabic
Mandrain
Portugees
All calls made through this feature are automatically recorded and securely stored under the Assets section, allowing teams to review, audit, or reference these recordings as needed.
Maps > Trips
The Trips tab allows users to view detailed trip information by Customer, Vehicle, or Job. This helps fleet managers track performance, monitor driving patterns, and analyze operational efficiency.
Key Features:
View Trips by Vehicle: Select a vehicle to see all trips it has made on a given date.
View Trips by Customer: Filter trips associated with a specific customer for billing or performance analysis.
View Trips by Job: Track trips related to specific assigned jobs for accountability and efficiency.
Trip Details: Each trip entry shows stops, driving time, distance traveled, idle time, and any exceptions triggered during the trip.
Map Integration: Click on any trip to view it directly on the map with the route highlighted.
Request Video: From the trip view, users can request historical video footage for any trip segment or exception.
Maps > Proximity
The Proximity tab enables users to search for assets, trips, or exceptions within a specific radius of a chosen address. This is especially useful for identifying nearby vehicles, assessing response times, or investigating incidents.
Key Features:
Search by Address: Enter an address or select a location on the map to center the proximity search.
Radius Filter: Specify the distance (e.g., 1 km, 5 km) to find vehicles, trips, or exceptions within that area.
View Exceptions Nearby: Quickly locate any exception events near a location.
Request Video for Exceptions: From this page, users can request historical video footage related to a specific exception.
Interactive Map: The map displays all results within the specified radius, including live locations, trip paths, and exceptions.
Assets > Device Health
The Device Health area displays essential diagnostics for your devices, including Communication Failures, Recording Health, and Data Usage. This view helps you quickly identify devices that are not communicating or recording properly so you can take timely corrective action.
Top Communication Failures
This list highlights all devices that have not communicated for more than three days. These devices require immediate attention to assess installation quality, connection issues, or power-related concerns.
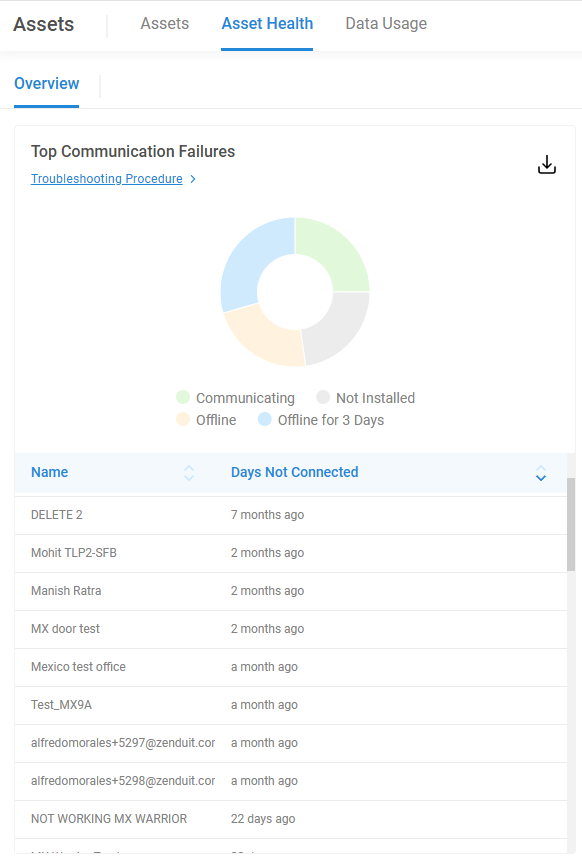
The accompanying chart categorizes devices into:
Communicating – Devices currently sending data.
Not Installed – Devices that have never communicated with the system.
Offline – Devices that are currently offline.
Offline for 3+ Days – Devices with prolonged communication loss requiring urgent review.
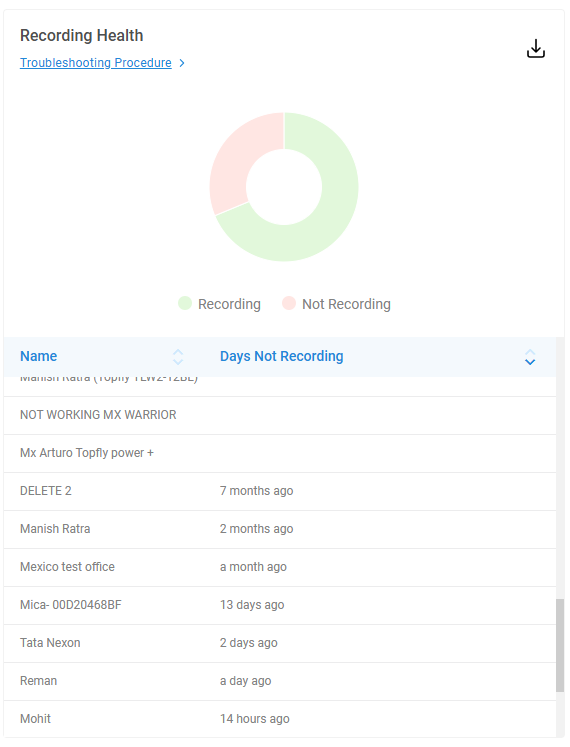
Assets > Recording Health
This section displays devices that have not been recording properly within a defined time frame.
If all devices are recording normally, the list will show no issues—indicating stable and healthy device performance.
Top Data Usage
For devices using data SIMs purchased directly from our company, this section provides insights into the highest data consumers.
Please note: Devices with SIM cards from your own carrier cannot be tracked for data usage.
Data usage is grouped into the following brackets for easy interpretation:
0–500 MB
500 MB – 1 GB
1–2 GB
2 GB+