ZenTemp Installation Guide
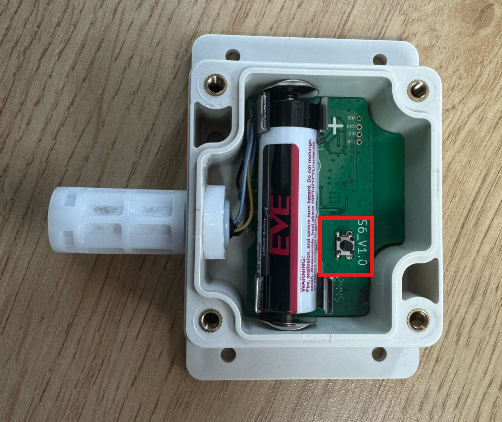
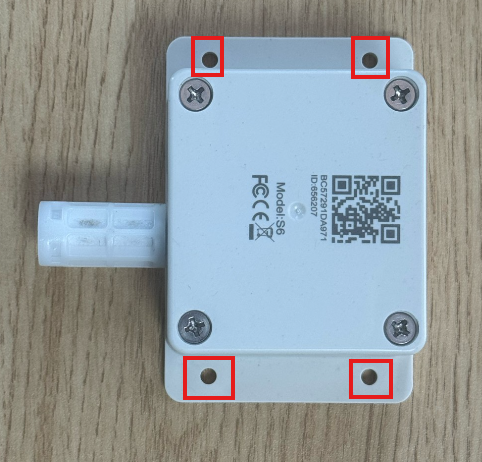
Product Overview: ZenTemp is a rugged BLE beacon designed to monitor temperature and humidity in assets, pallets, or containers. It features a square-shaped base with two parallel rectangular mounting flanges, each with two screw holes (four screws total). The device is powered by a replaceable battery and has an internal button for manual on/off operation. It is ideal for environments where secure, long-term monitoring is required.
Written By Support Team
1. Key Features
Temperature & humidity monitoring: Continuously reports environmental conditions.
Rugged square-shaped design: Durable housing suitable for industrial applications.
Mounting options: Screws (included) or optional double-sided tape (purchased separately).
BLE beacon: Compatible with ZenCam, IOX-BT, Asset Trackers, and ZenduOne.
Battery & power: Replaceable battery with internal button for manual power control.
2. Before You Start
You will need:
ZenTemp device
Screws for mounting (included) or optional double-sided tape (purchased separately)
Compatible BLE gateway
Smartphone with KBeacon Pro app installed (iOS/Android)
No password is required to activate the device.
3. Step 1 – Prepare the Device
Remove the device from packaging.
Locate the internal power button inside the device.
Press and hold the button to turn the device on. The beacon will begin broadcasting.
Verify battery level and initial readings in KBeacon Pro before installation.
4. Step 2 – Mounting the Device
Option 1 – Screws (recommended for rugged installations)
Position the device on a flat, stable surface.
Align the two parallel mounting flanges with the surface.
Secure the device using four screws, one in each mounting hole.
Ensure the device is stable and does not shift under vibration or handling.
Option 2 – Double-Sided Tape (optional)
Purchase strong double-sided tape if you prefer not to drill.
Apply tape to the bottom of the square base.
Press firmly onto the desired surface to secure.
Note: Adhesive may provide less stability in high-vibration environments.
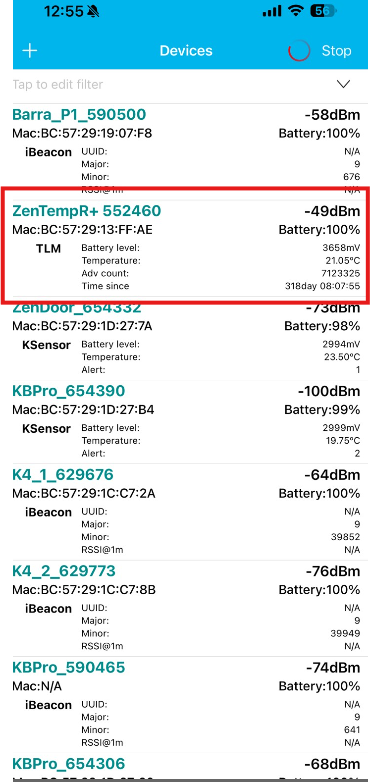
5. Step 3 – Verifying Operation
Open KBeacon Pro on your smartphone.
Scan for nearby BLE devices.
Select the ZenTemp beacon to verify:
Device is broadcasting
Temperature readings are reasonable
Humidity readings are present
Battery level is sufficient
6. Step 4 – Linking to ZenduOne
Log in to ZenduOne.
Navigate to the BLE Beacon / Devices section.
Add a new beacon:
Type: BLE Beacon / Asset Tracker
Enter ZenTemp serial/MAC

Assign to the correct asset (pallet, container, vehicle, etc.).
Verify that temperature and humidity readings appear correctly in the platform.
7. Best Practices & Notes
Use screws for maximum stability in rugged or high-vibration environments.
Optional double-sided tape can be used for temporary or low-stress installations.
Confirm the device is broadcasting before final installation.
Document device serial, location, and battery status for support or maintenance.