Zendu Truckmate - Implementation Guide & Scope of Work
Written By Philip Stanoev
Overview
ZenduIT partners with Geotab and TMW Systems to provide a complete, integrated solution interfacing both platforms. The Truckmate Add-in on Geotab Drive App enables drivers to update customized Truckmate pickup and delivery forms directly within Geotab Drive. Status and form updates are immediately sent to TMW Truckmate software for dispatchers to view status and delivery confirmation, allowing quick response to field changes and improved customer service with timely, accurate billing.
TruckMate is a comprehensive trucking industry solution managing billing, dispatching, maintenance, asset management, driver recruitment, and company information in one central system. It integrates with other business systems using an open software development kit.
Purpose
This document serves as the primary reference and implementation guide for Truckmate with MyGeotab Add-In and Geotab Drive App. Implementation requires understanding of Truckmate Server Setup on Customer Internal Mobile Communication Server, typically available through company IT involved in Truckmate Implementation/Server. The Truckmate Geotab Add-In can be fully self-implemented by these resources through this guide. Intended audience includes end customers and champions of the Truckmate Geotab Drive Application.
Solution Features
Core Functionality
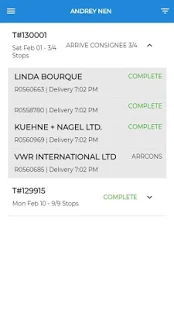
Truckmate Add-in on Geotab Drive App: Drivers complete Work Orders directly from Geotab Drive App on phones/tablets using Truckmate Add-in
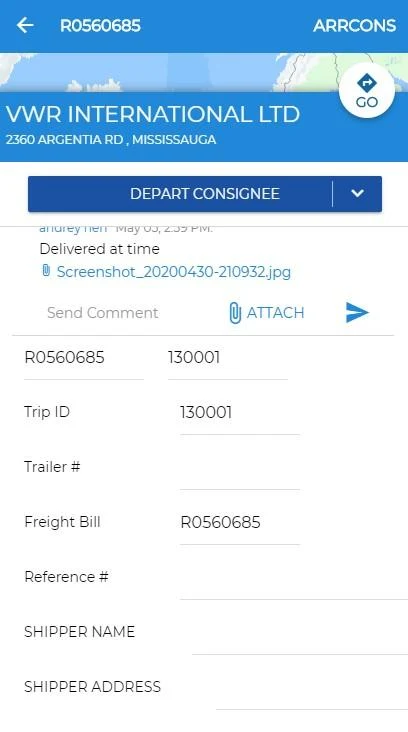
Freight Bill Status Update: Drivers complete Truckmate Forms on Geotab Drive to update Work Order status, reflected in TruckMate against Freight Bill and Trip ID
Driver Forward and Return Forms: Macro setup dispatched from TruckMate shown to Geotab Driver users in original format for forward and return forms. Return submissions reflected in TruckMate (Proof of Delivery, Notes, etc.)
Driver Schedule: All stops organized in optimized sequence order from Truckmate
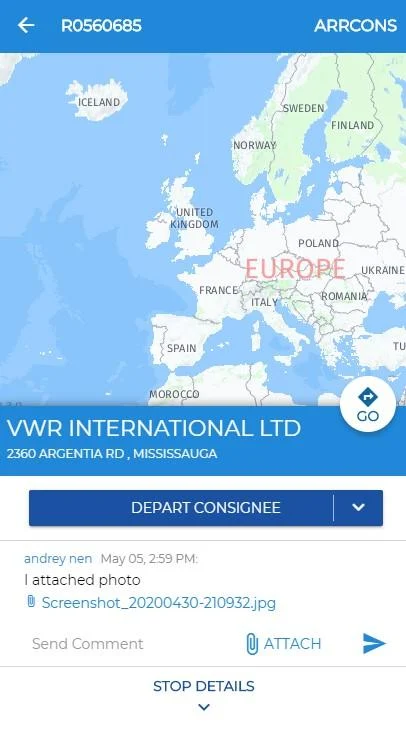
Google Maps and Contact Call Shortcut: Each freight bill stop has shortcut links to open Google Maps or call associated contact
Automatic Status Update: Freight bill status automatically updated based on vehicles entering/exiting geofence locations
Geotab Data Integration: Geotab HOS Availability and Logs Update
Proof of Delivery: All POD files stored for document management use by Synergize
Additional Features
Automatic Emails: Notification emails sent to customers when on route and upon proof of delivery confirmation
Image Upload: Picture-taking capability that adds images to OSD notes page on freight bill in Truckmate
Custom Forms (Future/Paid): Fleet Manager can create custom forms as required
Implementation Process
Assumptions & Understanding
Customer has Truckmate Subject Matter Expert and/or IT Administrator who facilitated Truckmate implementation
Understanding of Customer & Zenduit efforts per implementation guide
Acceptance of Scope of Work & Implementation Process & Quote
Payment of implementation price required for Zenduit to begin work
Zenduit assists setup and shows Customer how to add return macro fields (Trailer). Customers manage return form fields for future workflow process modifications
Remote access provided by customer to log files for troubleshooting through RDP
Time required by Customer/Truckmate not included in timeframes
Truckmate Setup Template: https://docs.google.com/spreadsheets/d/1XZhknWgffamBi3dIXVx21XcJPwwnnqgGM6sRLpbNK7E/edit?usp=sharing
Users and Roles
Reseller/Sales/Primary Sponsor
Responsible for leading the project, initiating and coordinating roles and expectations for implementation per guide.
Company Lead
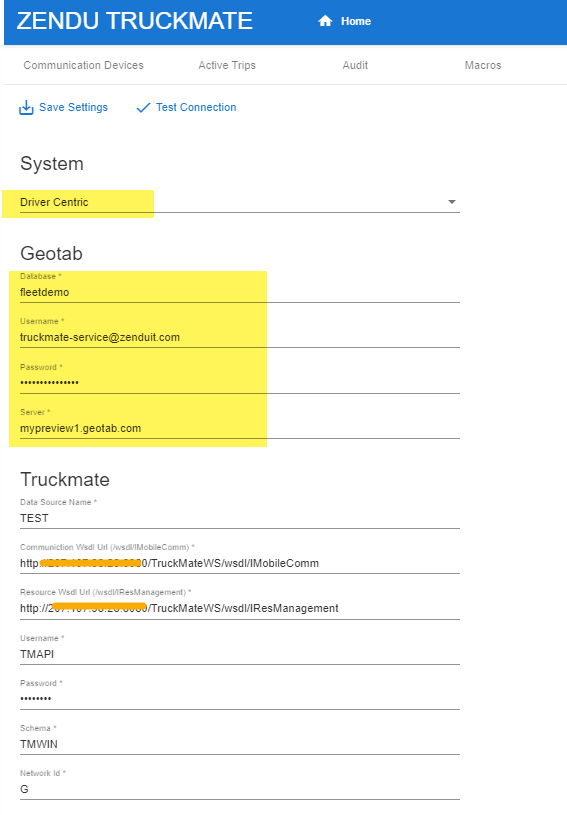
Communicates with internal IT team to gather and pass Setup details, Truckmate support, and driver information per implementation guide. Company IT team responsible for filling server and API details in "General" page boxes.
Truckmate Support
Helps with answers relating to functionality and modules. Reference "Truckmate" section of general tab.
ZenduIT
Assists with communication, general problems, and driver onboarding using Zenduit Truckmate App. Facilitates app training as required.
Customer Preparation for Truckmate Integration
Required Steps
Engage TMW Support/Sales: Enable mobile communication API if not already enabled. Allows Zenduit to communicate with Truckmate
GET Mobile Communication API Key: Obtain key with WSDL and SOAP endpoints (example: AE-12CF-4354-B16D-1111ABBCC555). Available on Truckmate TierAdmin Application
GET Localhost Public IP or Domain Name: Truckmate API Server connection to Web Services http://localhost:8080/TruckMateWS (replace "localhost" with Public IP or Domain Name for Zenduit (whitelist: 34.68.2.111) to access mobile communication server). Company IT performs self-assessment ensuring mobile communication web accessibility (route port, forwarding setup) for troubleshooting and support
GET Truckmate DSN Name: Database name for company
GET Truckmate Network ID: Truckmate API Identifier and Schema. Add Geotab Account if not configured and add respective details

Request Install: Zenduit Truckmate Add-IN and apply gathered credentials in "General Settings" tab
Test Connection: Verify connection from Truckmate to Zenduit Service. If connection test fails, review step 3 and perform self-assessment for access, confirm API credentials with Truckmate Support
Setup & Sync Truckmate Macros

Macro Configuration
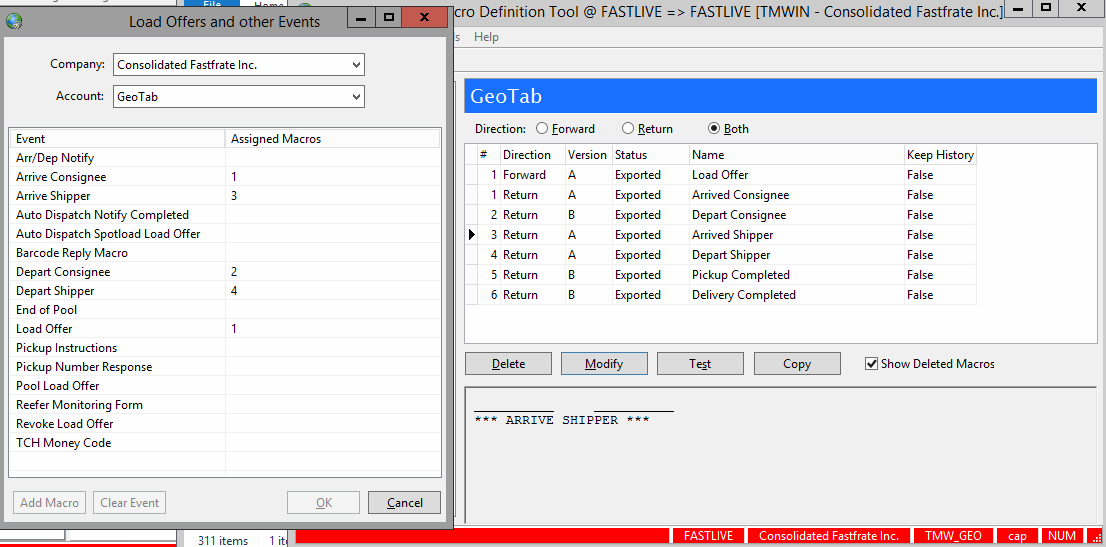
Truckmate Macros are forms typically set up by Company IT during implementation. They represent information presented to drivers (forward/load offer) and information required back from drivers (return forms). These forms drive status updates within Truckmate and are crucial for setup. Companies using Truckmate Dispatching through another telematics provider may choose existing necessary forms for operations and recreate/copy from existing provider to "Geotab" tab within Macro Definition tool.
Reference Video: https://drive.google.com/file/d/1admmiLHEDs12DYOnHMySdR1FjwShgXdK/view (recommended additional training around Macro Best Practices from TMW Truckmate for comprehensive instructions for new implementations and refreshers)
Minimum Requirements
Macros with status of arrship, depship, arrcons, depcons, complete are required. Each return macro must contain fields: Offered Freight Bill Number (13-Freight) and Trip Number (14-Trip) in response. Identify appropriate macros associated with these for setup.
Setup Process
Customer Creates/Modifies Truckmate Macros within Truckmate Macro Definition Tool for standard status updates (Pickup & Delivery Status Updates)
Sync Macros in Truckmate Add-In (Macros)
Verify all macros loaded as shown
Check macro fields for respective macros to be used
Setup meeting with Zenduit Project Manager to review Macros and define macros within General Settings
Driver App & Macro Settings
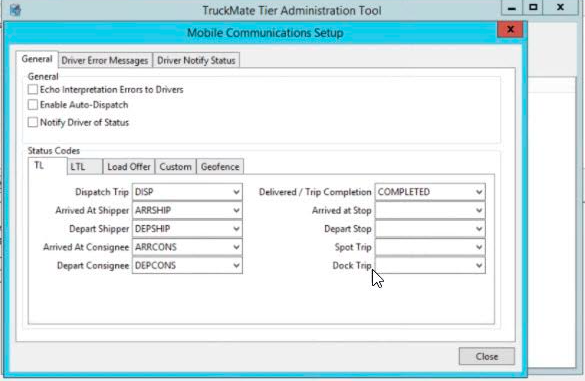
Mobile Communication Setup
On Truckmate API Server setup Mobile Communication statuses within Truckmate Tier Administration Tool Application
Go to "Coms+Setup" → "database" and right click respective database to open mobile communication setup
Open mobile communications setup window and setup statuses for relevant operations
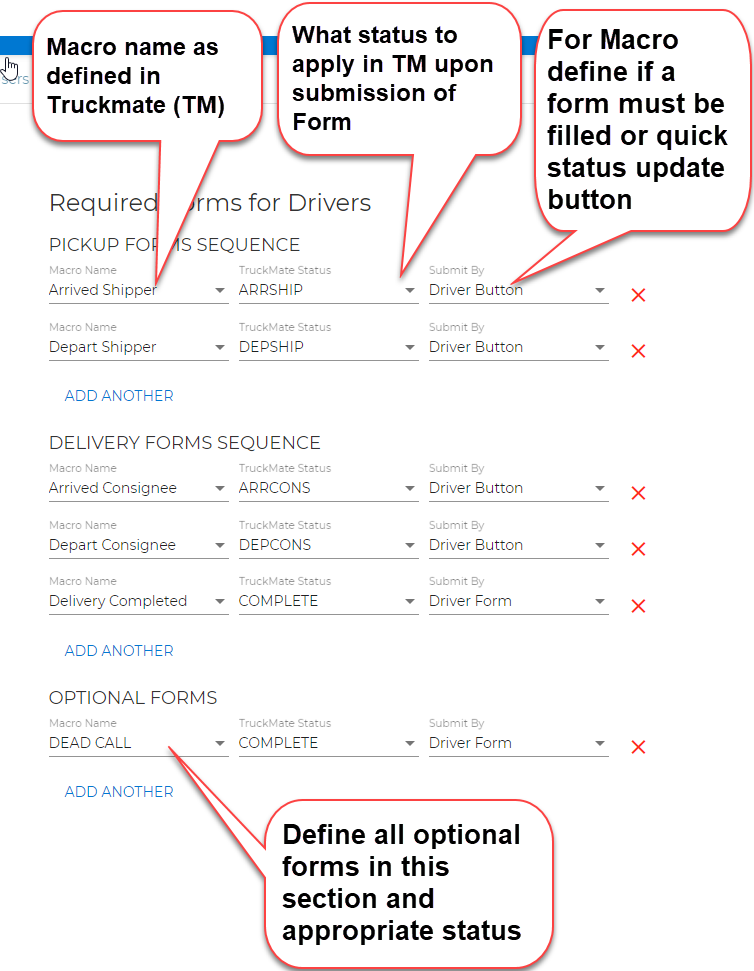
Once Macro Forms and Statuses are set up in Truckmate Macro definition tool, define appropriate macros and statuses within "General Settings" of Truckmate Add-In. Driver Button submission allows quick status update from driver on app. Where driver form completion required (delivery completed), select Driver Form instead of Driver Button.
Note: For companies with multiple Truckmate Instances, go to Macro Definition Tool and select appropriate company, account, and assigned macros.
Device Mapping & App Install
Customer Setup with Truckmate Mobile Communication Device Manager
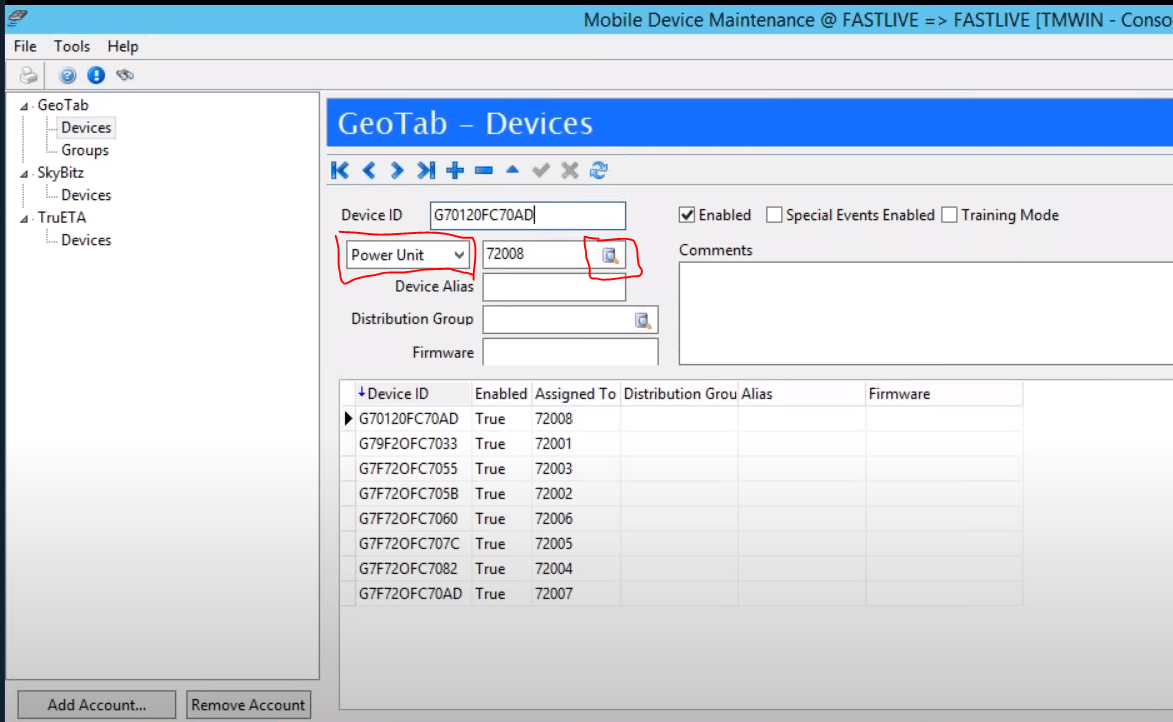
Setup each driver/power unit within Mobile Device Maintenance application in Truckmate (Note: may label DeviceID with same name as Power Unit ID/Driver; if using two Telematics Providers, add prefix to distinguish when dispatching - example: Device ID = "Geotab-72008")

In Geotab Add-In go to general settings and setup configuration (Note: Power Unit = Vehicle Centric, Driver = Driver Centric). Go to Communication Devices tab and Click Sync Devices
Select each device and define appropriate Geotab/Telematics User/Vehicle with Truckmate Driver/Power Unit
Testing
Zenduit & Customer Dispatch
Go to "Users" in Truckmate Add-In and select appropriate test driver
Add Driver Mobile Phone number to send SMS to driver to Install App
Driver installs app and logs in with Geotab User Credentials
Dispatch Truckmate Load Offer from Multi-Mode Dispatch to Power Unit/Driver
Driver sees Load Offer and updates relevant forms to update status
Each status and form update observed against freight bill in Truckmate
Review macros and refine as required, repeat testing
Driver App View: Trips → Work Order Map Preview → Work Macros
Acceptance Checklist & Go-Live
Training & Install with Dispatchers & Drivers
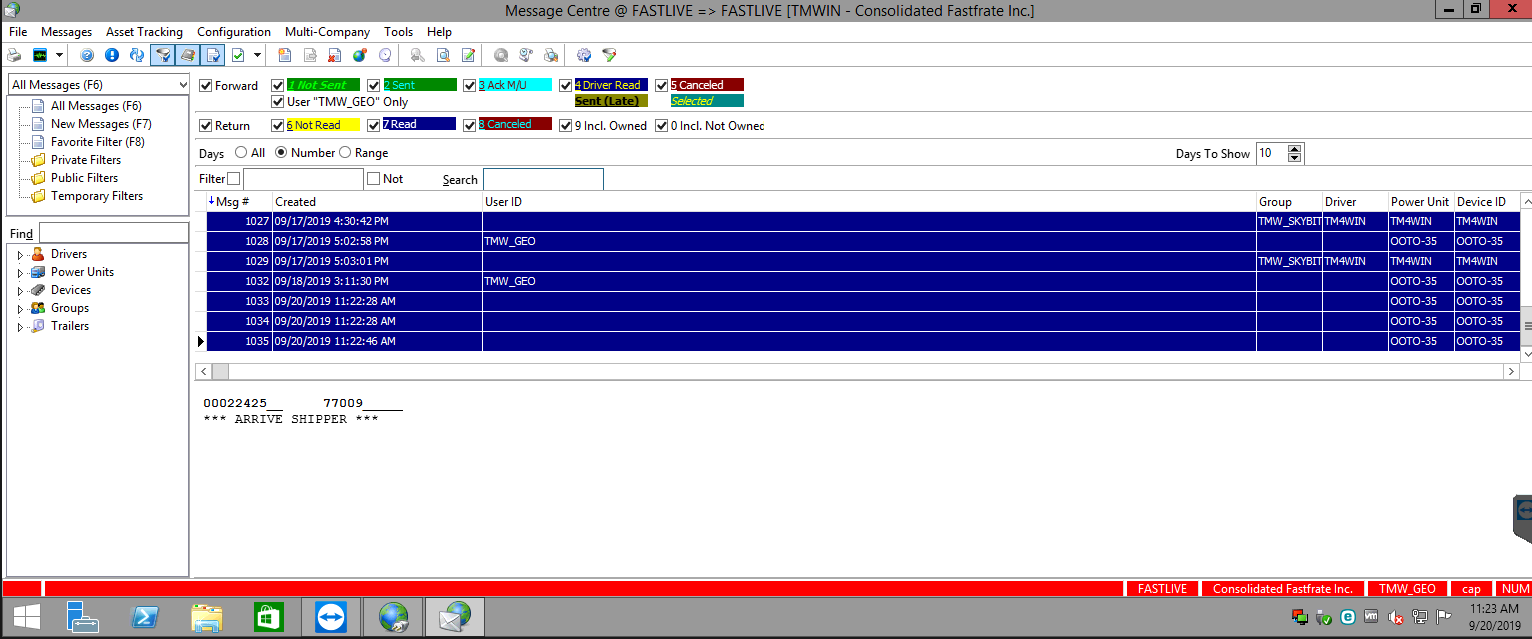
For Testing within Truckmate see delivery of dispatch and message statuses through Truckmate Application - Messaging Center
Zenduit provides IT Admin Training on Truckmate Add-In Active Trips & Audit Module
General Driver Training Video on Truckmate App available
Reference checklist below