ZenduBUS (Shuttle) Admin User Guide
Written By Kamakshi Mahajan
ZenduBUS (Shuttle) User Guide
By GoZen
Introduction
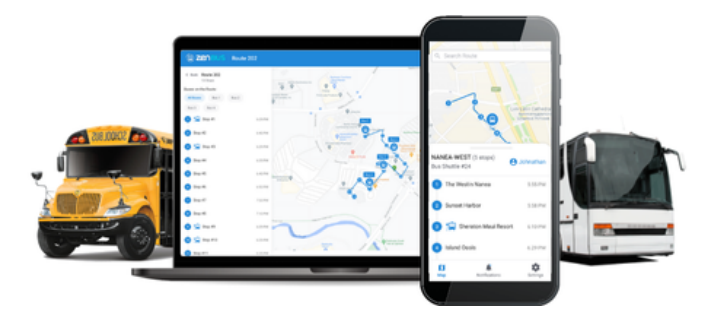
ZenduBUS is a software application that equips school and shuttle administration (managers) with the ability to create Bus Routes - giving real-time notifications and updates on the bus location and arrival.
The ZenduBUS mobile app is a simple and effective way to deliver school bus data while increasing student safety.Function
How does it work?
The ZenduBUS application works by communicating with telematic hardware installed on the buses. The hardware will transmit real-time data of the bus activity/location along with various other information. This information will be gathered and relayed into the application for parents and passengers to easily digest.
The ZenduBUS solution has two services:
1. School
2. Shuttle
Depending on the service purchased, the experience and setup will vary.
Common questions and concerns that can be answered by ZenduBUS
● “I want to know when the bus is running late or canceled”
● “What time will the bus arrive at my stop?”
● “Is my child on the bus?”
● “Did my child get off the bus? If so, where?”
Why do schools and shuttles use ZenduBUS?
● “I want to reduce inquiries and calls regarding bus activity”
● “I want to monitor bus activity for safety and operational purposes”
● “I want to increase school and shuttle bus adoption by providing a positive and experience”
ZenduBUS Terminology
Traveller: This is the individual who will be on and off-boarding the school bus (i.e. Student)
Guardian: This is the individual who is responsible for the “Traveller” and will be monitoring the school bus and student activity via the ZenduBUS App.
Waypoint: Waypoints are specific points or locations set by a user to define a customized route that deviates from the automatically generated path. By adding waypoints, users can direct the navigation system to follow a particular course, bypass certain areas, or include specific destinations along the journey, providing greater control over the route taken.
Add-in Setup
To manage ZenduBUS routes and users, you will need to first setup the Add-in on your MyGeotab™ account.
What is an “Add-in”?
An add-in, also known as an add-on or plugin, refers to a software component that adds specific features or functionality to an existing application or program. It is designed to extend the capabilities of the host application and provide additional tools or services.
To add the ZenduBUS Add-in, follow these steps:
1. Login to your MyGeotab™ Account
2. Navigate to System > System Settings
3. Click the “Add-Ins” tab
4. Set Allow unverified Add-Ins to “Yes”
5. Click “+ Add-In”
6. Copy and paste the following into the text field under the Configuration tab
{
"name": "ZenBUS",
"supportEmail": "support@zenduit.com",
"version": "1.0.0",
"items": [
{
"url": "https://zendu-bus-eta.firebaseapp.com/assets/geotab-addin.html",
"path": "",
"menuName": {
"en": "ZenBUS",
"fr": "ZenBUS"
},
"icon": "https://storage.googleapis.com/zenduit-icons/BusETA.svg"
}
],
"isSigned": false
}
Click “OK” to add your add-in to the list
Click “Save” on the top left to finish the installation
For additional information, please visit the link below:
https://community.geotab.com/s/article/How-to-install-add-an-add-in-I-have-developed-into-a-My Geotab-database?language=en_US
Now the Add-in should be installed and you can find the ZenduBUS application on the side menu bar on your MyGeotab™ account.
System Setup - Shuttle Service
Route Configuration
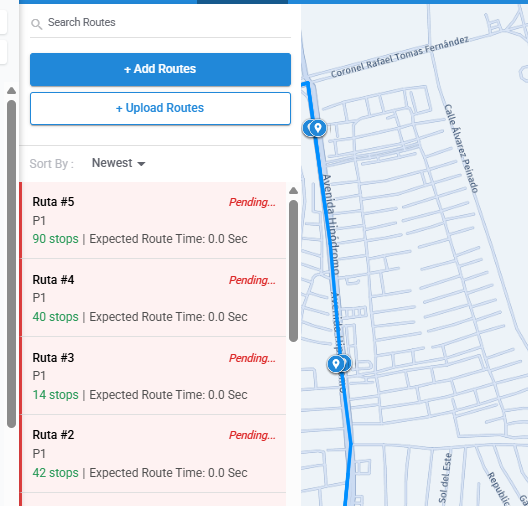
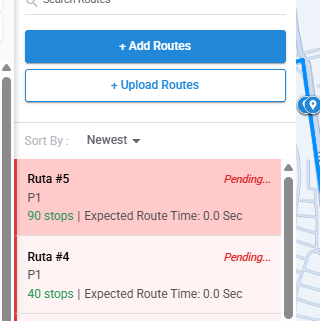
Add Routes
1. Navigate to the “Routes” tab.
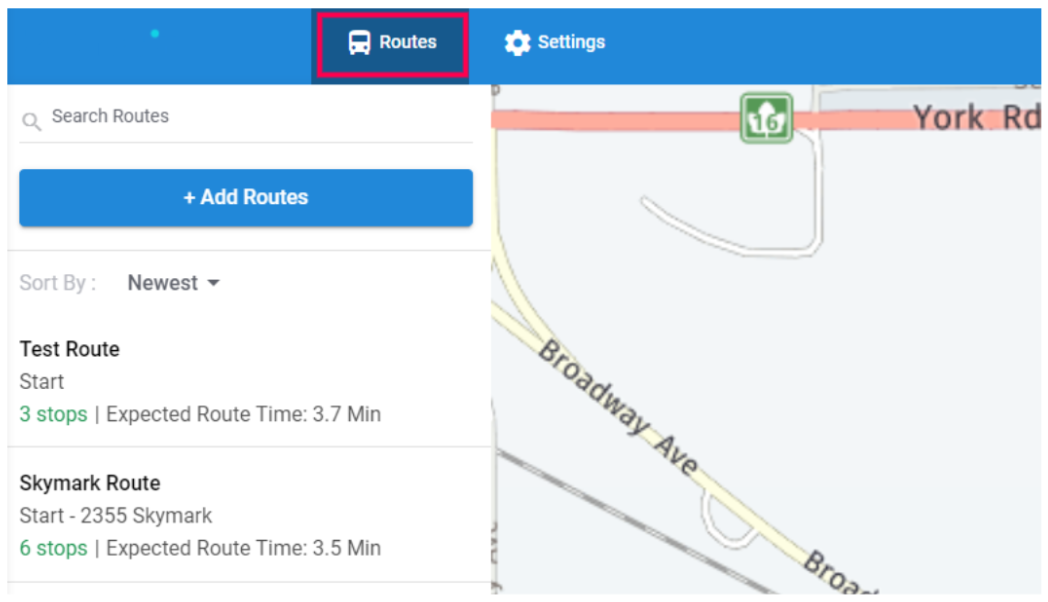
Select “+ Add Routes”.
Populate the Route fields and click "Save".
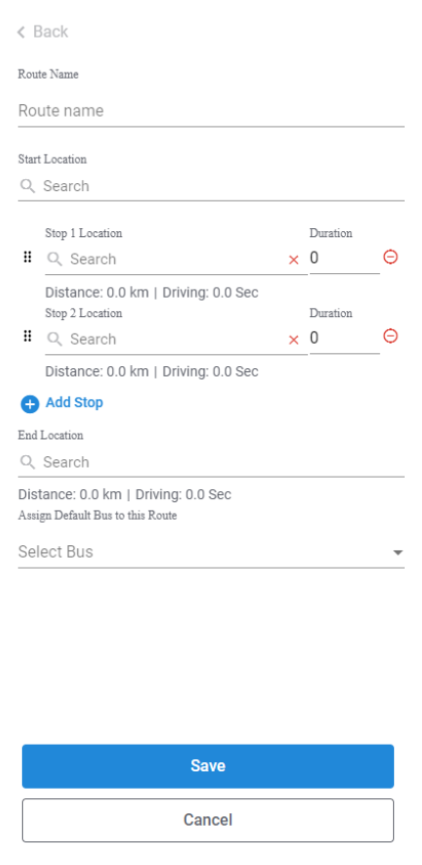
This route has now been saved and can be accessed and viewed by passengers.
Alternatively, if you wish to save a route, but do not want it to appear on the passenger-facing side, simply create a route and do not assign a bus to it. It will appear as “Pending…” until you assign a bus/vehicle to it.
Additionally, the routes can be configured and setup using APIs, Please contact GoZen Service for support.
Upload Routes (KMZ/KML-only)
Users may also upload pre-configured routes from a different compatible software.
Navigate to “+ Upload Routes” button
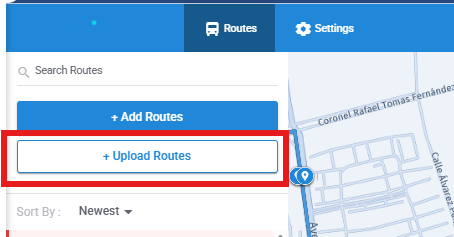
Select a file type
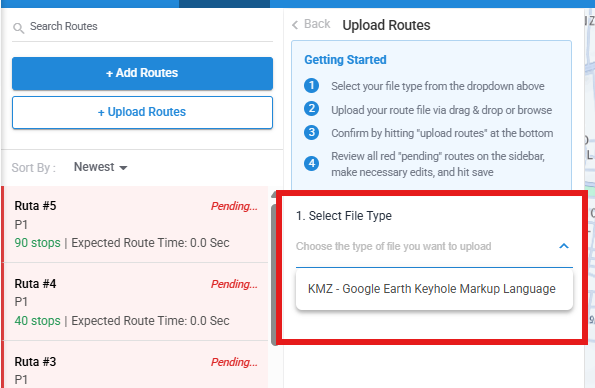
Currently, the only file type supported by ZenBUS is KMZ - Google Earth Keyhole Markup Language.
Ensure your file follows the file requirements. Refer to the video tutorial below to properly set up your routes on Google Earth:
Upload your route.
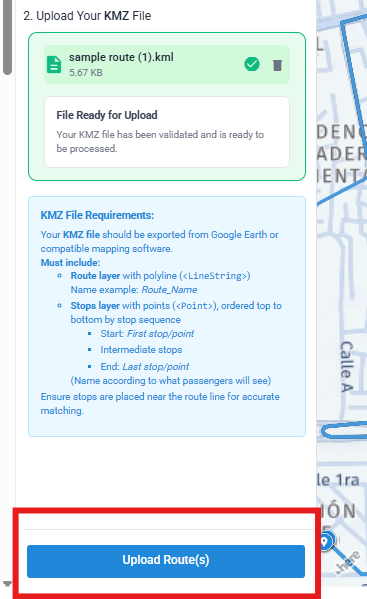
After uploading a route, it will appear green. Hit the “Upload Route(s)” button. Check the notification in the bottom right corner to ensure the route has been uploaded properly. Upon successful upload, the route will appear as “Pending…” on your routes bar.
In order to save these routes, simply go in, hit edit, and assign it a vehicle or bus.
Shuttle Settings
1) [Orange] - This is where you have the option to establish a depot. It could be a designated facility or location where buses are stored, maintained, and dispatched. To uphold privacy and reduce passenger confusion, you can implement a geofence that conceals buses from public view once they enter the specified radius. This ensures that buses remain hidden while within the depot.
2) [Green] - The "Public Application" setting allows you to access the URL leading to a public web view of your routes. Additionally, you can assign a specific name to the portal, which will be visible on the public view.
Accessing & Viewing ZenduBUS
Via the ZenduBUS Mobile Application
Both ZenduBUS School and Shuttle services are viewable by our dedicated mobile app. Find the links below to download ZenduBus app:
IOS Store Download (Apple Devices): https://apps.apple.com/ca/app/zenbus/id1576474079
Google Play Store Download (Android Devices): https://play.google.com/store/apps/details?id=com.zenduit.eta&hl=en&pli=1
Via the ZenduBUS Web Application
Both ZenduBUS School and Shuttle services are viewable by our dedicated web app.
Link to web app: https://zenbus.zenduit.com/select-service