ZenCAM x Geotab Native View: Integration Overview
Written By Support Team
Introduction
ZenCAM is now available through a native view within Geotab, moving beyond the traditional isolated add-in experience. ZenCAM functionality is embedded directly into the core pages you already use, including Maps, Trips, and Exceptions.
The primary purpose of this integration is to eliminate the need for multiple browser tabs. Instead of navigating between two separate systems or jumping in and out of an add-in, you can now manage video and telematics through a single, synchronized interface for day to day activities.
Functional Integration Areas
1. Map & Trips Integration
ZenCAM is now available on the Geotab Map and Trip history.
Live Interaction: Access live streaming and broadcasting directly from the map.
Direct Communication: Call drivers or send Text-to-Speech (TTS) messages (individual or mass) to the ZenCAM hardware without leaving your current view.
Status Visibility: See camera details directly alongside vehicle telematics.
2. Exceptions & Rules
Video evidence is now tied directly to Geotab’s native reporting.
Rule Correlation: When a Geotab Exception is triggered for a Geotab Rule setup in the addin, the corresponding ZenCAM video is surfaced within the Exception details.
Single-Pane Review: Review the telematics data and the video proof in one place, ensuring you have the full context of an event immediately.
ZenCAM Rule Setup (Coming Soon): Set up camera rules in Geotab, view details, and access corresponding ZenCAM video directly within the Geotab Exception view. (Coming Soon)
3. Facial AI & Driver Assignment (Coming Soon)
We have synced ZenCAM’s facial recognition directly into Geotab’s driver management logic.
Auto-Assignment: The camera identifies the driver via facial AI and automatically assigns that user to the vehicle within Geotab.
Log Accuracy: This ensures that all trips and exceptions are attributed to the correct driver in Geotab without manual intervention.
Installation & Setup
To enable the ZenCAM native experience, you must add the integration code to your Geotab database via the System Settings.
1. Accessing System Settings
There are several ways to navigate to your settings in MyGeotab:
Via Profile: Click on your User Profile icon in the top-right corner and select System Settings.
Via Search: Use the Geotab search bar and type "System Settings."
2. Adding the ZenCAM Integration
Once you are in the System Settings menu:
Select the Add-Ins tab at the top of the page.
Click the Add Add-In (plus icon) to open the configuration window.
Depending on your current setup, choose one of the following options:
Option A: New ZenCAM Users
If you do not have the original ZenCAM Add-In installed, you must add both the core integration and the native view. Use the following code block:
{
    "name": "ZenduCAM",
    "supportEmail": "support@zenduit.com",
    "version": "1.0",
    "items": [
        {
            "url": "https://trax.zenduit.com/trax.html",
            "path": "ZenduCAM",
            "menuName": {
                "en": "ZenduCAM"
            },
            "icon": "https://trax.zenduit.com/Images/ZenducamIcon.png"
        },
        {
            "page": "exception",
            "url": "https://zenduone-map-addin.web.app/frames/exception-footage.html?v=4",
            "tabTitle": "Footage"
        },
        {
            "page": "exceptions",
            "title": "ZenCAM",
            "noView": false,
            "mapScript": {
                "src": "https://zenduone-map-addin.web.app/scripts/mapAddin.js?v=2"
            }
        },
        {
            "page": "tripsHistory",
            "title": "ZenCAM",
            "noView": false,
            "mapScript": {
                "src": "https://map-addin.zendu.one/scripts/mapAddin.js?v=2"
            }
        }

    ],
    "isSigned": false
}
Option B: Existing ZenCAM Users
If you already have the standard ZenCAM Add-In active, you only need to add the native view component. Use the following code block:
{
    "name": "ZenCAM View",
    "supportEmail": "serviceaccount@zenduit.com",
    "version": "1.0",
    "items": [
        {
            "page": "exception",
            "url": "https://zenduone-map-addin.web.app/frames/exception-footage.html?v=4",
            "tabTitle": "Footage"
        },
        {
            "page": "exceptions",
            "title": "ZenCAM",
            "noView": false,
            "mapScript": {
                "src": "https://zenduone-map-addin.web.app/scripts/mapAddin.js?v=2"
            }
        },
        {
            "page": "tripsHistory",
            "title": "ZenCAM",
            "noView": false,
            "mapScript": {
                "src": "https://map-addin.zendu.one/scripts/mapAddin.js?v=2"
            }
        }

    ],
    "isSigned": false
}
3. Finalizing the Setup
Click Done and Save in the top-right corner of the System Settings page.
Refresh your browser (or log out and log back in).
You should now see the ZenCAM native elements appearing within your Map, Trips, and Exceptions pages.
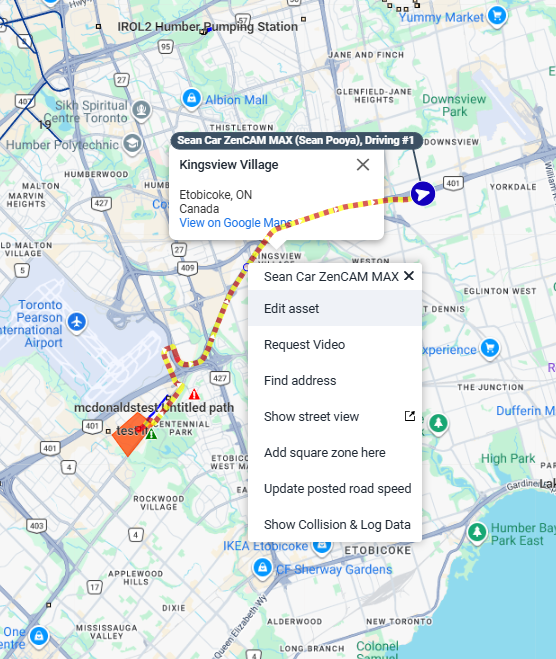
Navigating the Map Interface
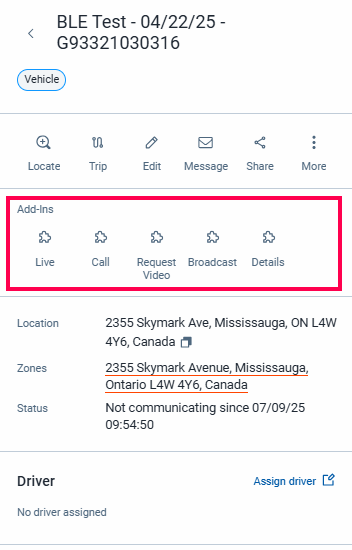
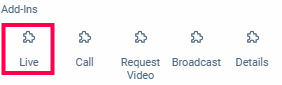
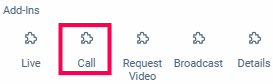
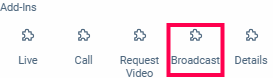
When you select an asset on the map, the ZenCAM native controls appear in the side panel under the Add-Ins section.
The ZenCAM icons (Live, Call, Request Video, Broadcast, Details) will only appear if a ZenCAM unit is correctly paired with the Geotab device.
If you do not see these icons: This indicates the Geotab device is not currently paired with a camera.
For pairing, begin by accessing the Assets tab in the ZenCAM add-in and select the camera asset you wish to configure. Under the settings menu, click edit and locate the field labeled Third-Party Telematics Serial Number. Enter the Geotab serial number into this field and save your changes. This connection allows the two systems to communicate and ensures the ZenCAM features appear directly within your Geotab interface
If you do see these icons: It confirms that a camera is associated with the vehicle and all features are ready for use.
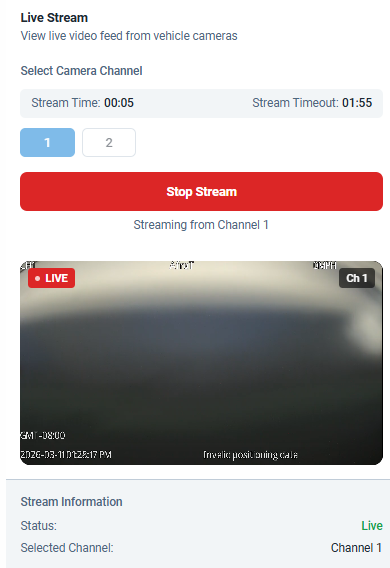
1. Live Stream
Clicking Live opens the real-time video interface.
Multi-Channel Viewing: You have the flexibility to select specific channels or stream all camera feeds simultaneously.
Session Timeout: To manage data usage and hardware health, the system enforces a strict 2-minute timeout per session.
Status & Counters: A live countdown timer is visible. If your data plan includes time limits (e.g., 10 or 30 minutes), the remaining balance is displayed below the status information. Once reached, the system will stop the stream or revert to snapshot mode.
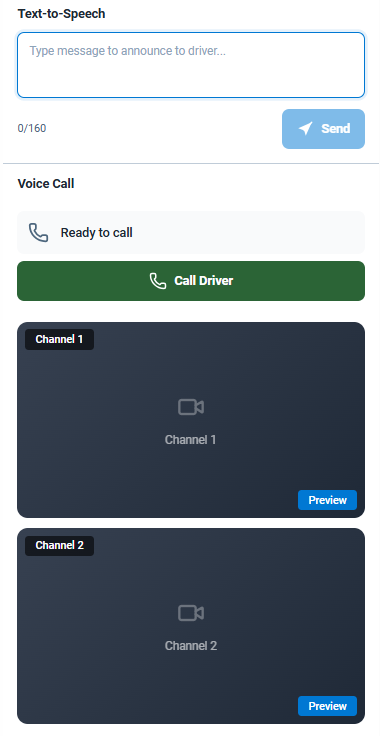
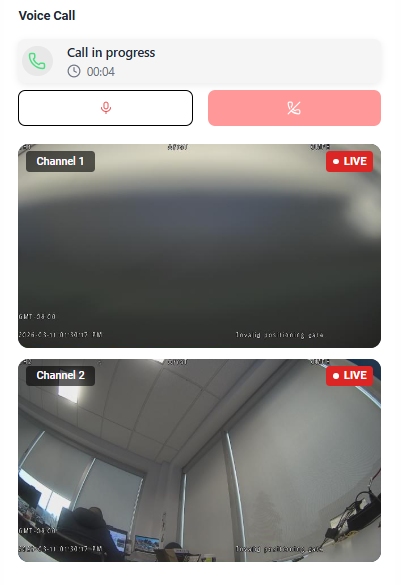
2. Voice Call & Driver TTS
The Call feature allows for immediate driver interaction to avoid "blind" communication.
Visual Verification: Before initiating the call, the view provides a snapshot of the driver and road so you can verify the driver's current state before speaking.
Initiating Calls: Click Call Driver to start a voice session through the ZenCAM hardware.
Individual Text-to-Speech (TTS): Type a message into the text box to have it read aloud to the driver instantly.
 |  |
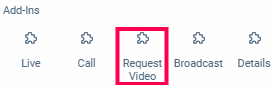
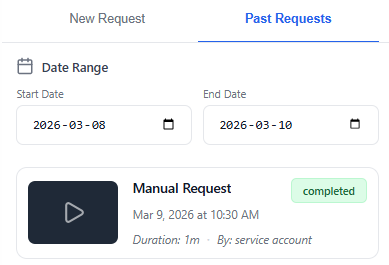
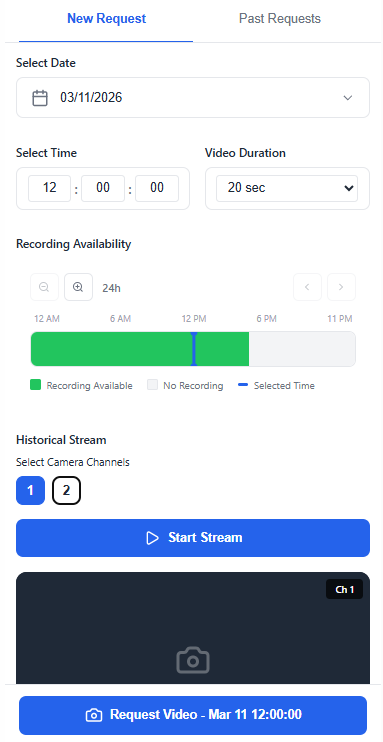
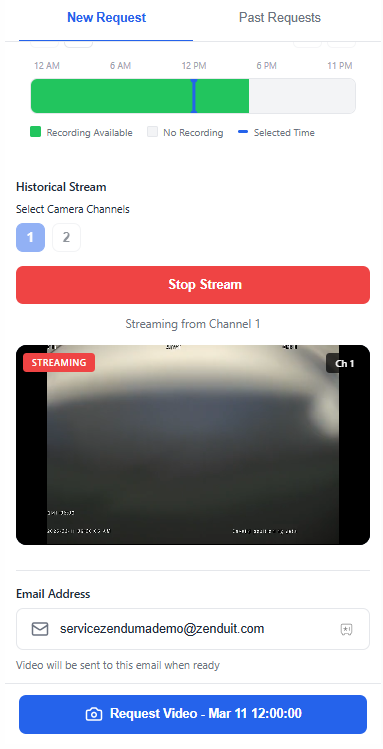
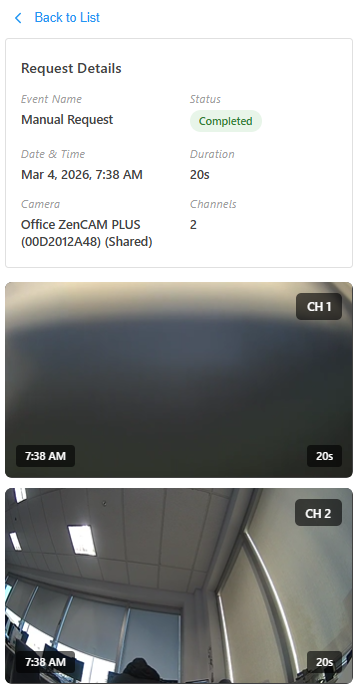
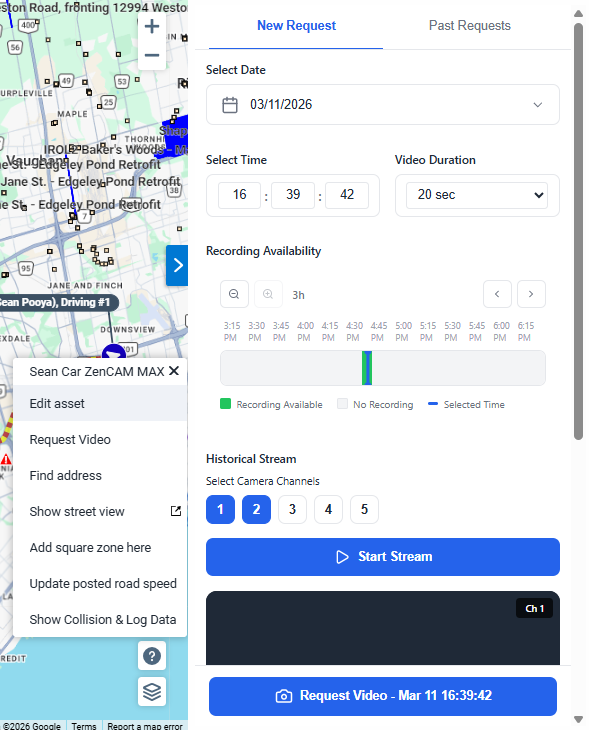
3. Request Video (Historical Footage)
The Request Video tab is used to retrieve recorded footage from the camera’s internal storage.
Recording Availability: The date picker highlights days with available recordings. The "Recording Availability" bar (Green) shows exactly when footage is present.
Historical Stream: You can stream a "preview" of the historical footage to verify the event before requesting the full high-resolution file.
Request Settings: Select a duration (from 20 seconds up to 8 minutes in 20-second intervals) and enter the email address where the footage should be sent.
 |  |  |
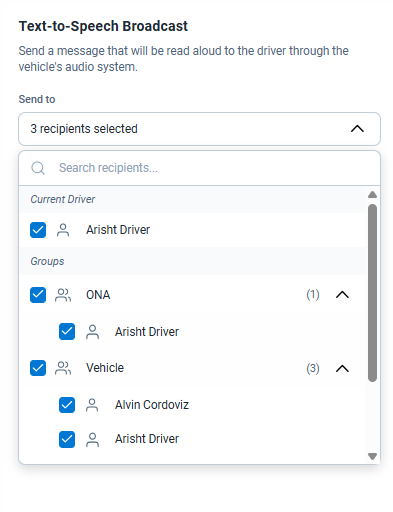
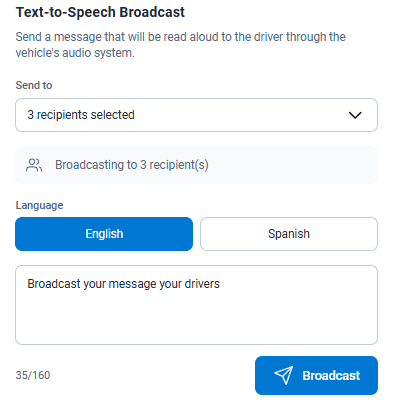
4. Broadcast (Mass TTS)
The Broadcast tool is designed for fleet-wide communication.
Recipient Selection: Select multiple drivers or specific groups to receive the alert.
Multilingual Support: Choose the broadcast language (English or Spanish) for the message.
Instant Dispatch: Type the message and click Send to have the message read aloud to all selected vehicles simultaneously.
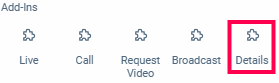
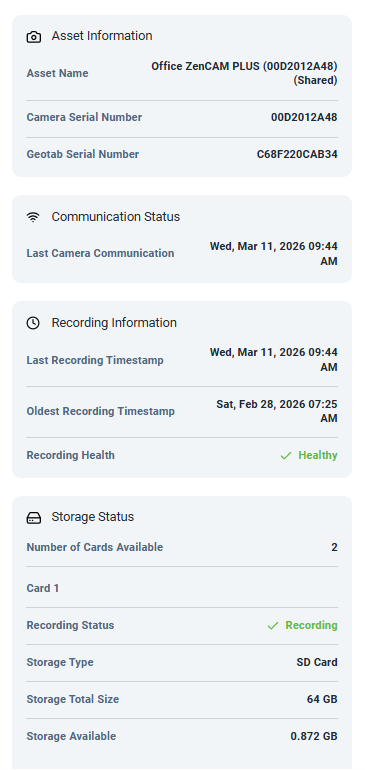
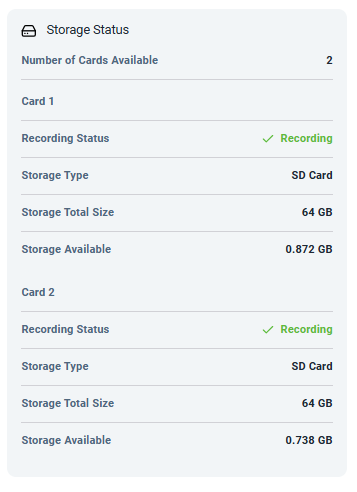
5. Camera Details
The Details tab provides a real-time health check for the hardware:
Communication Status: Shows the last successful "heartbeat" from the camera.
Recording Information: Displays timestamps for the oldest and newest footage on the device and confirms "Recording Health" is healthy.
Storage Status: Displays the number of SD cards available, total storage size, and remaining space.
 |  |
Requesting Video from Trips
The Trips View integration allows you to retrieve video evidence based on specific historical GPS breadcrumbs. This ensures that when you identify a moment of interest in a vehicle's route, you can instantly access the corresponding footage.
To request video from a specific point in a trip, follow these steps:
Access the Trip: Navigate to the Trips History page in Geotab and select the vehicle and date range you wish to review.
Select a Breadcrumb: On the map, locate the specific breadcrumb (GPS point) where you want to see the video.
Initiate Request: Left-click on the breadcrumb to open the standard Geotab action menu. You will see a native Request Video option added to the list.
Video Request Module: Clicking this will automatically open the ZenCAM video request module in the side panel.
The Date and Time will be pre-populated based on the specific breadcrumb you clicked.
You can then select your preferred channels, preview the historical stream, and finalize the request as usual.
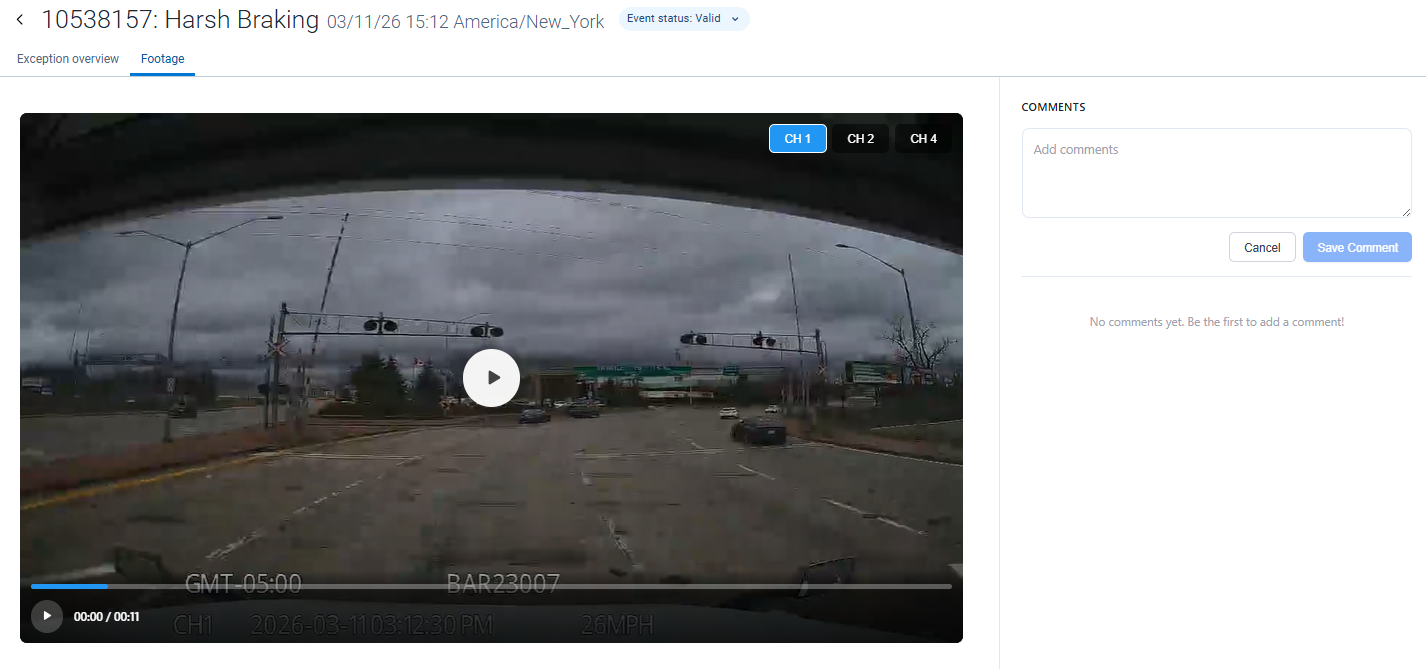
Video-Enhanced Exceptions
The exception view will now allow you to transition seamlessly between telematics data and visual proof. When you view an exception in Geotab:
Geotab Overview: You initially see the standard Exception Overview, which includes speed, g-force data, and the event location.
Footage Tab: A Footage tab appears alongside the overview. Clicking this tab allows you to play the ZenCAM video associated with that specific event.
Multi-Channel Review: You can switch between available camera channels (e.g., Road, Cabin, Side) to get a complete view of the incident and add comments for coaching or insurance purposes.