MyInstallHub User Guide - For Fleet Managers
MyInstallHub is a mobile-first marketplace that connects fleet managers who need telematics devices installed in their vehicles with qualified installers who can do the work. This guide walks you through every step — from creating an account to completing your first installation.
Written By Support Team
MyInstallHub
A step-by-step guide for fleet managers and installers
— — —
PART 1 · For Fleet Managers
PART 2 · For Installers
Version 1.0 · April 2026
Welcome to MyInstallHub
MyInstallHub is a mobile-first marketplace that connects fleet managers who need telematics devices installed in their vehicles with qualified installers who can do the work. This guide walks you through every step — from creating an account to completing your first installation.
How the platform works
MyInstallHub connects two types of users:
Fleet Managers (customers) post installation projects, receive bids, select an installer, and track progress through to completion.
Installers browse available projects in their service area, submit competitive bids, win work, and log each installation directly in the app.
Everything happens in a single app — no email chains, no scattered spreadsheets, no chasing updates.
How to use this guide
This guide is split into two parts. Start with the section that matches your role:
Part 1 — For Fleet Managers
Part 2 — For Installers
An appendix at the end covers account recovery and general support.
Before you begin
Download the MyInstallHub app from the App Store (iOS) or Google Play (Android).
Have your business details ready — company name, service addresses, and contact information.
Fleet Managers will need a vehicle list; Installers will need business credentials and service area details.
PART 1
For Fleet Managers
Post installation projects, receive bids from qualified installers,
and track every install from start to finish.
1. Creating Your Account
Open the MyInstallHub app and tap Sign up on the welcome screen.
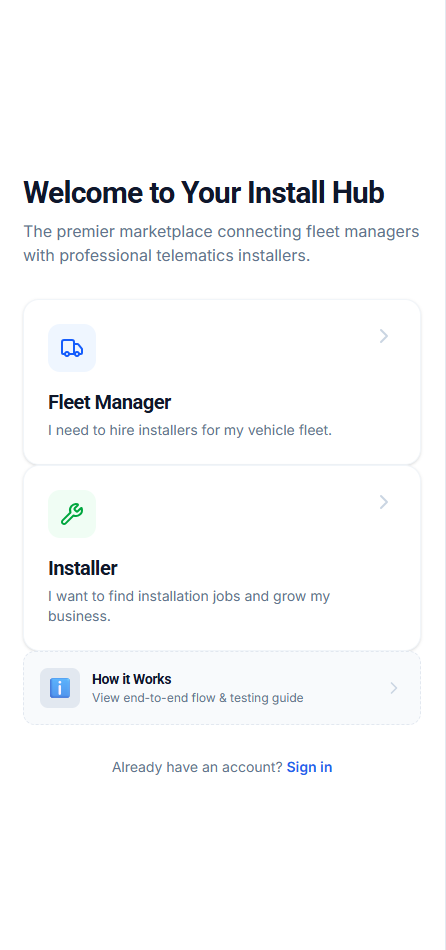
/The welcome screen — tap Fleet Manager to start.
Fleet Manager registration
Select the Fleet Manager card and complete the registration form. You'll provide:
Your full name and business contact information.
Company name.
Your primary site details — site address, on-site contact name, phone, and email.
A secure password.
Review the Customer Agreement and Privacy Policy, accept, then tap Create Account.
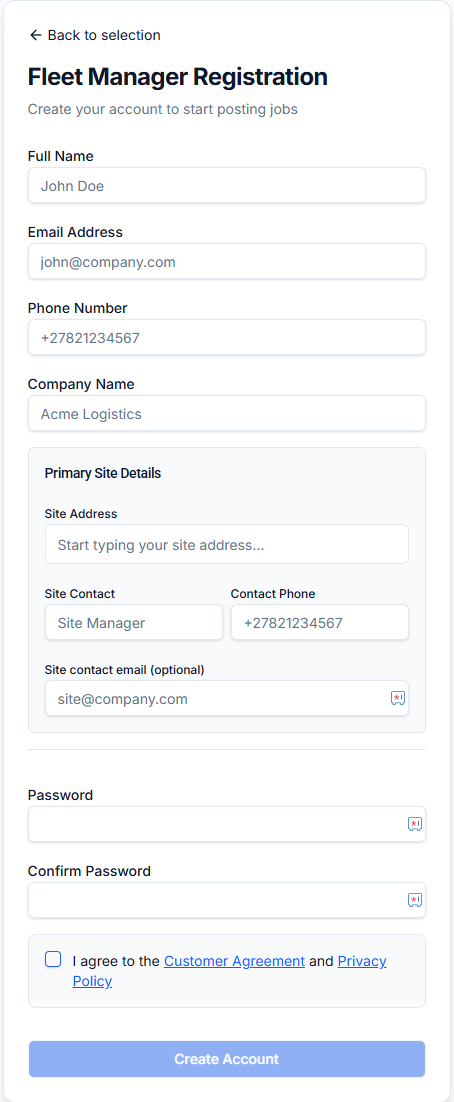
The Fleet Manager registration form.
2. Setting Up Your Profile
After signing in, complete your company profile so installers have the full picture when they review your jobs.
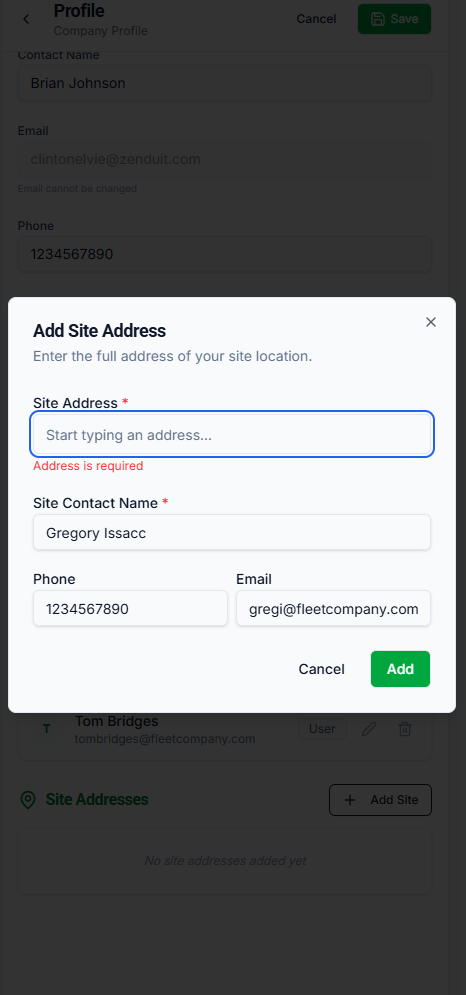
Adding site addresses
Most fleets operate from more than one site. Add each location where installations may take place.
1. Open your profile. From the main menu, go to Profile → Company Profile.
2. Tap Add Site. Under Site Addresses, tap the + Add Site button.
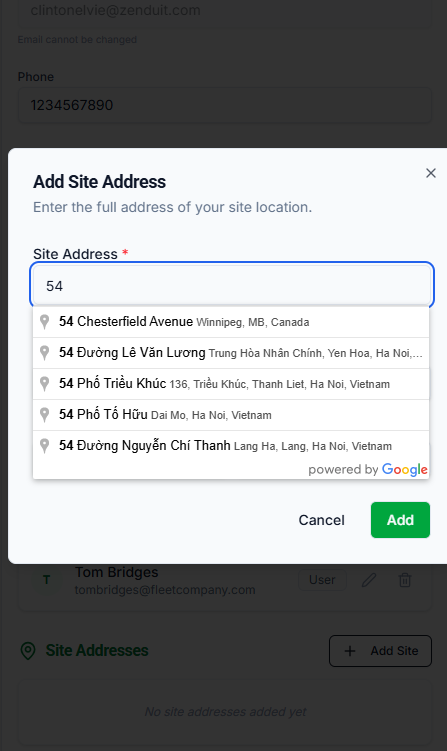
3. Enter the site address. Start typing and pick the match from the Google dropdown — this ensures the address is clean and geocoded correctly.
4. Add the site contact. Name, phone, and (optional) email for the person on-site.
5. Save. Tap Add to save. Repeat for each site.
3. Creating a Project
A project represents one installation job — it can cover anywhere from a single vehicle to an entire fleet rollout.
Start a new project
From the main dashboard, tap + Create New Job. This opens the project creation flow.
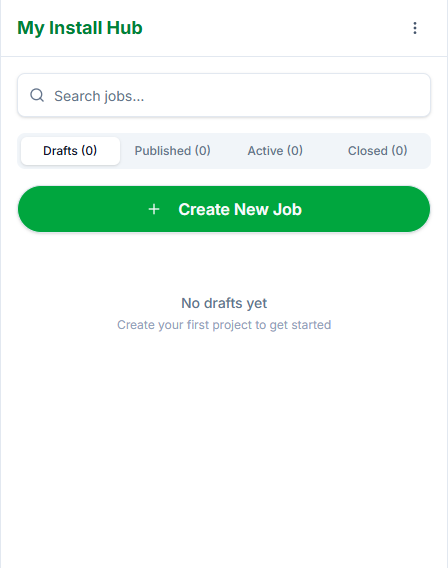
The Jobs dashboard — Drafts, Published, Active, and Closed tabs.
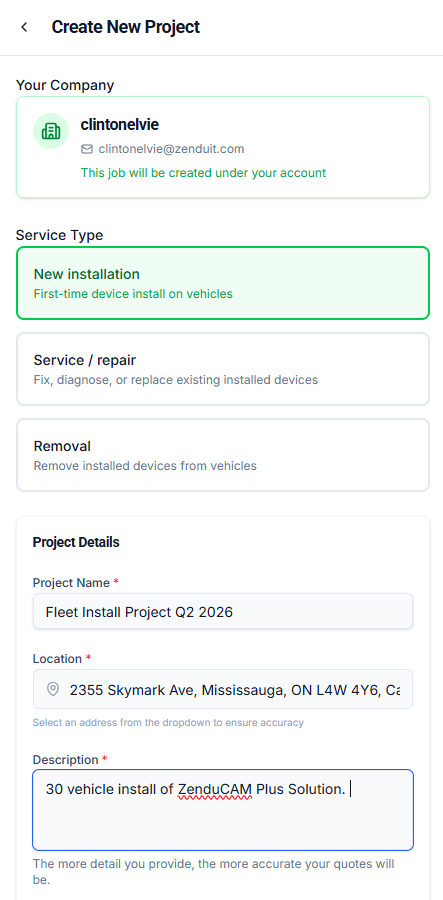
Service type and project details
Choose the type of work required:
New installation — first-time device install on vehicles.
Service / repair — fix, diagnose, or replace existing installed devices.
Removal — remove installed devices from vehicles.
Then fill in the core project details:
Project name — a clear label for your internal reference.
Location — pick from your saved site addresses.
Description — describe the work. More detail means more accurate bids.
Desired start date — when you need the work to begin.
Bid deadline — the date after which you'll no longer accept new bids.
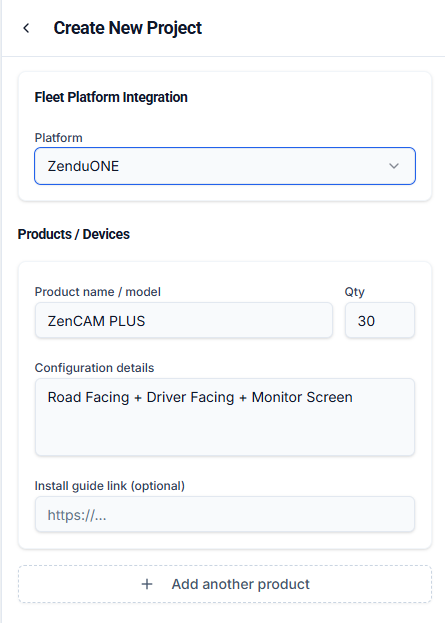
Fleet platform integration
Next, specify which telematics platform the installed devices will report to. Two options are supported:
ZenduONE — already connected. No additional credentials needed.
Geotab — requires you to enter and verify your Geotab database credentials so devices can be auto-provisioned during install.
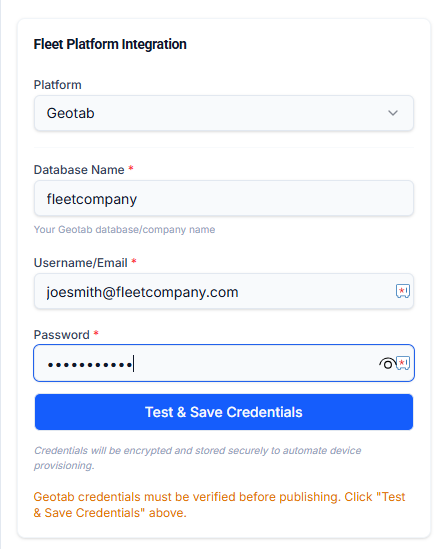
Verifying Geotab credentials
When you choose Geotab, enter:
Database name — your Geotab database/company name.
Username/email — typically your Geotab admin login.
Password — stored encrypted.
Tap Test & Save Credentials. When the green Verified badge appears, you're ready to continue.
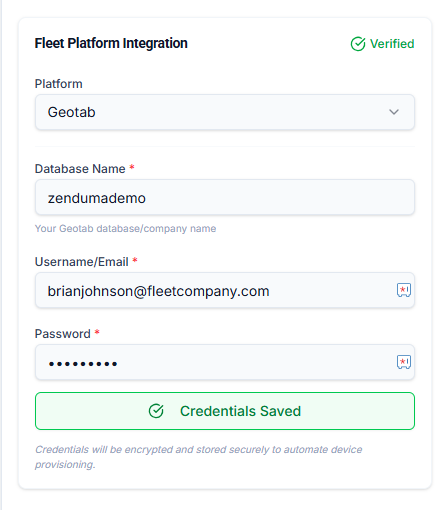
Credentials verified — you'll see the green Verified badge.
Products and devices
Specify exactly what's being installed on each vehicle:
Product name / model — e.g. ZenCAM PLUS, GO9.
Quantity — how many units are being installed.
Configuration details — e.g. Road Facing + Driver Facing + Monitor Screen.
Install guide link (optional) — URL to product installation instructions.
You can add multiple products if the project covers more than one device type.

Products and devices section with ZenCAM PLUS × 30.
4. The Vehicle List
The vehicle list is the single most important part of your project. It tells installers exactly what they'll be working on — which means more accurate bids, faster scheduling, and fewer surprises on install day.
Why every column matters
Every column in the template is there for a reason. Skipping details here leads to incomplete bids, wrong pricing, and delays. Here's what each column is used for:
Location / City Name — helps installers evaluate travel and regional coverage.
Vehicle ID — your internal vehicle number, used to track installs across the fleet.
Year, Make, Model — installers need to know the vehicle type to estimate install time and compatibility.
VIN — optional but highly recommended. Enables exact vehicle identification and post-install verification.
License Number — used on the installation report and for vehicle matching.
Installation Location Address — where the vehicle will actually be at install time. Can differ from your primary site.
Hours of Availability — the window the vehicle is accessible for install (e.g. 9-5PM EST). Critical for scheduling.
Site Contact Name, Number, Email — who the installer reaches on the day of install. Install-day coordination happens with this person.
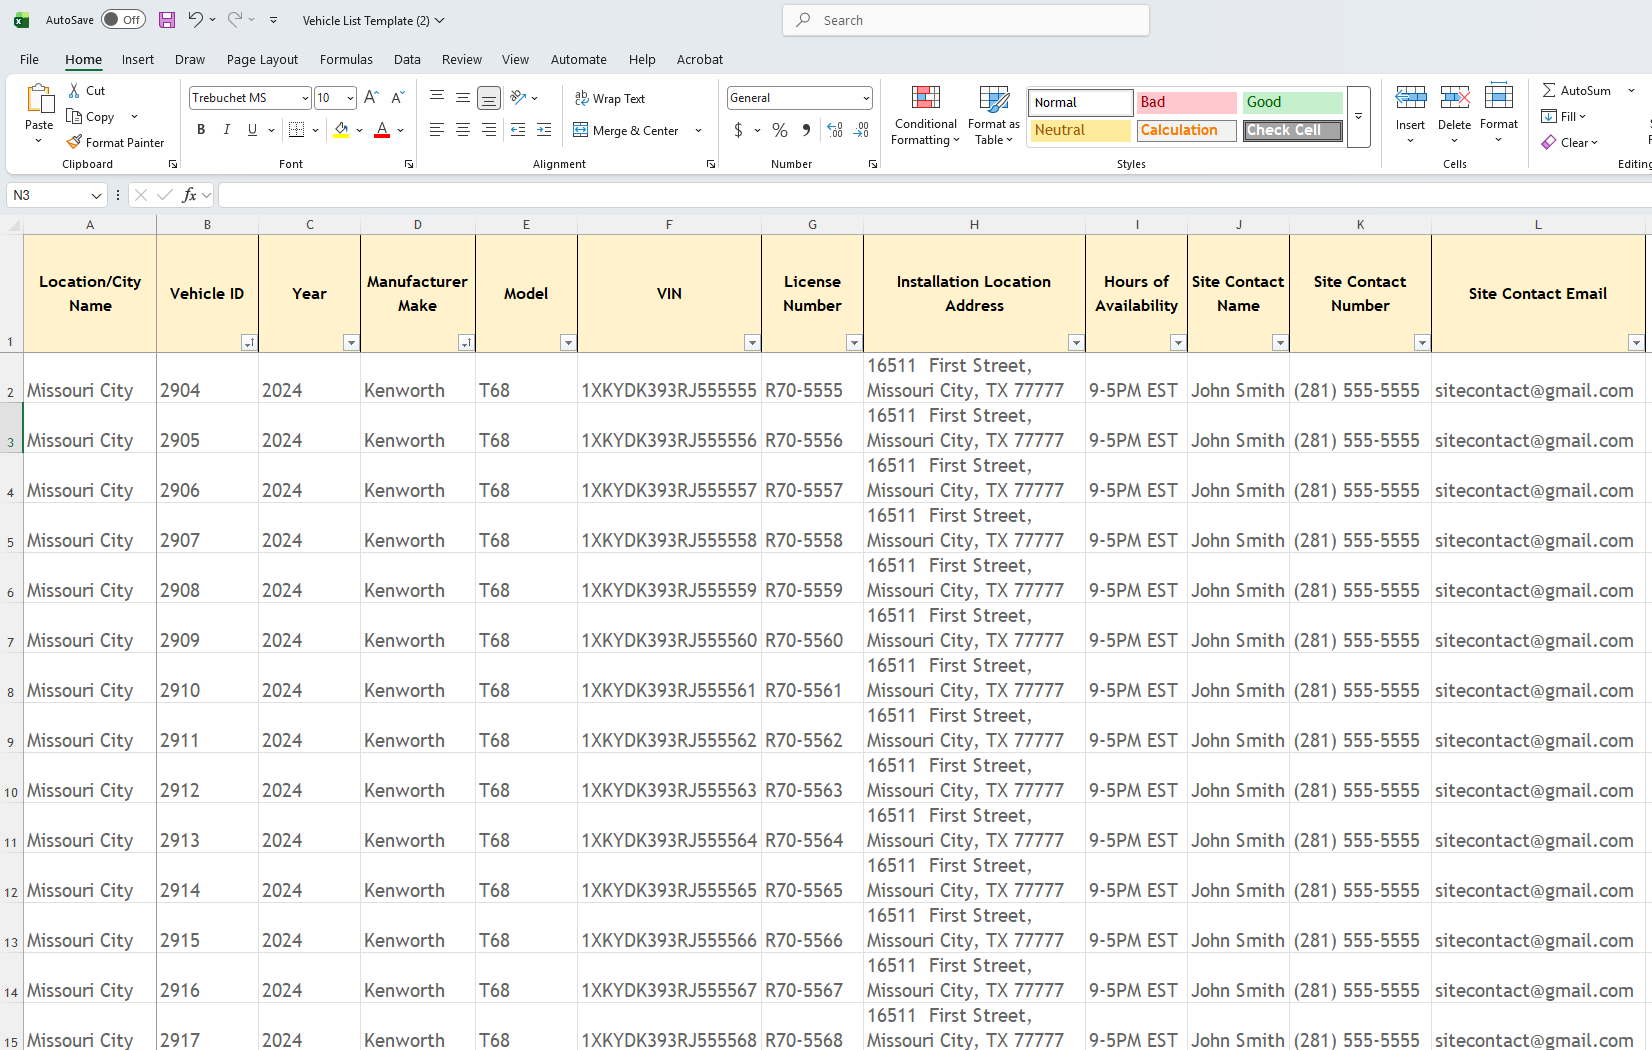
The vehicle list template — every column contributes to an accurate bid and smooth install day.
Uploading the vehicle list
1. Download the template. Tap Download vehicle list template (.xlsx) to get the blank spreadsheet.
2. Fill in every row. One row per vehicle. The number of rows must exactly match the total vehicle count you entered.
3. Save and upload. Save the completed file and tap Upload your completed vehicle list.
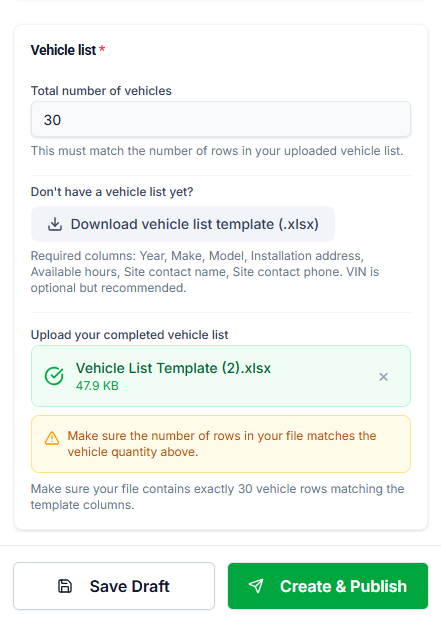
Vehicle list template download and upload.
Save as draft or publish
You can Save Draft at any point to come back later, or tap Create & Publish to push the project live to the installer marketplace.
5. Publishing and Managing Bids
Published projects
Once published, your project appears in the Published tab with a yellow "Awaiting Bids" badge. Qualified installers in your service area will see the job and can begin bidding.
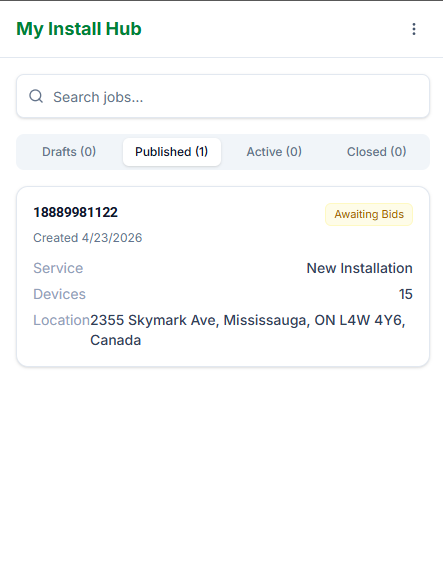
A published project awaiting bids.
Reviewing incoming bids
As bids come in, the project card shows the count ("2 Bids", etc.). Tap the project to open it and compare bids side-by-side.
For each bid you'll see:
Installer name and company.
Total bid amount.
Pricing structure — either All-inclusive (one flat rate) or Itemised (per-unit rate plus travel).
Rate per device × quantity, plus any travel or cancellation/no-show fee.
Submission date.

Comparing received bids — tap Accept Bid to award the job.
Accepting a bid
Tap Accept Bid on your preferred installer's bid. The project immediately moves to the Active tab, and the installer is notified. All other bids are automatically declined.
6. Monitoring Your Active Project
Once a bid is accepted, the project moves to the Active tab and installation work begins. You can follow progress in real time — every vehicle logged, every device installed, every photo uploaded.
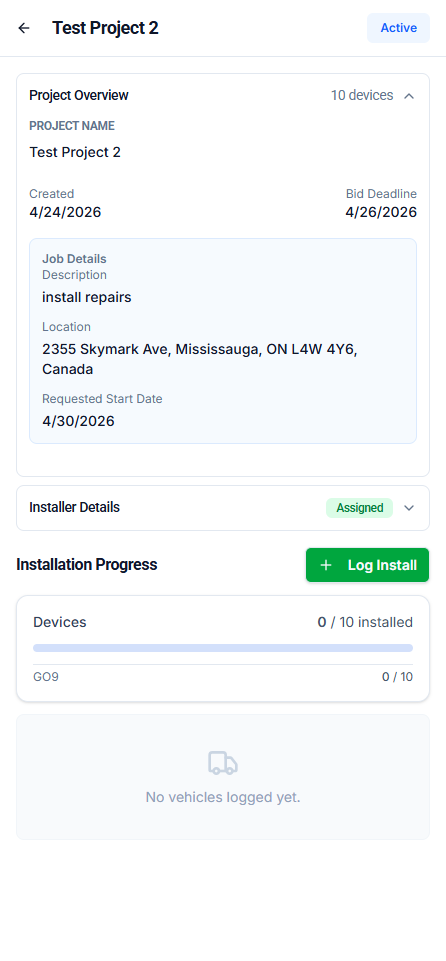
The active project view — real-time installation progress.
What you'll see
Project overview — name, dates, description, location.
Installer details — the company you awarded the work to.
Installation progress bar — X of Y devices installed.
Device breakdown — per-device-type counts.
Vehicle log — every vehicle the installer has serviced so far.
7. Project Completion and Reports
Once the installer completes and submits the final installation report, your project automatically moves to the Closed tab.
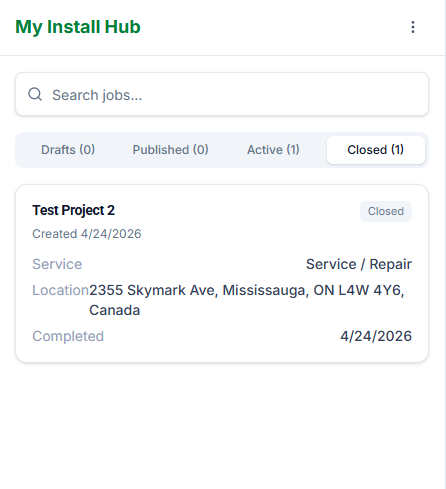
A completed project in the Closed tab.
Reviewing the Job Report
Tap the completed project to open the full Job Report. At a glance you'll see:
Total devices, installed count, and issue count.
Percentage complete and progress bar.
A searchable, filterable vehicle log showing every vehicle, device serial, plate, and technician.
Filter by status: All, Completed, In progress, Issues, Pending.
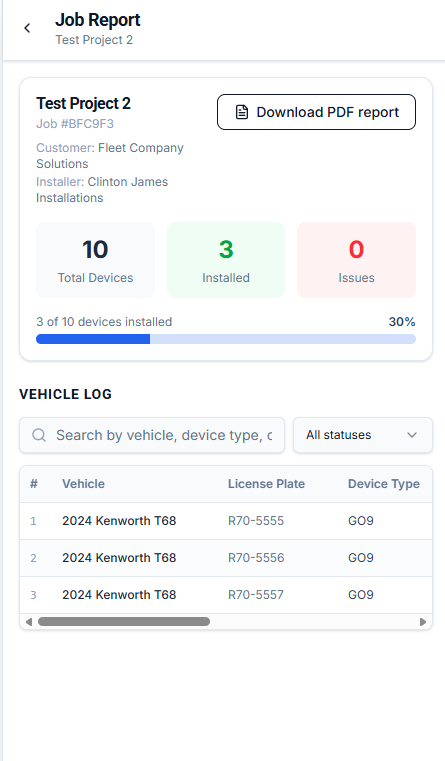

The Installation Report PDF
Tap Download PDF report to export a polished Installation Report containing the full job details, customer and installer information, the installation activity log, and a summary of photos captured during each install.
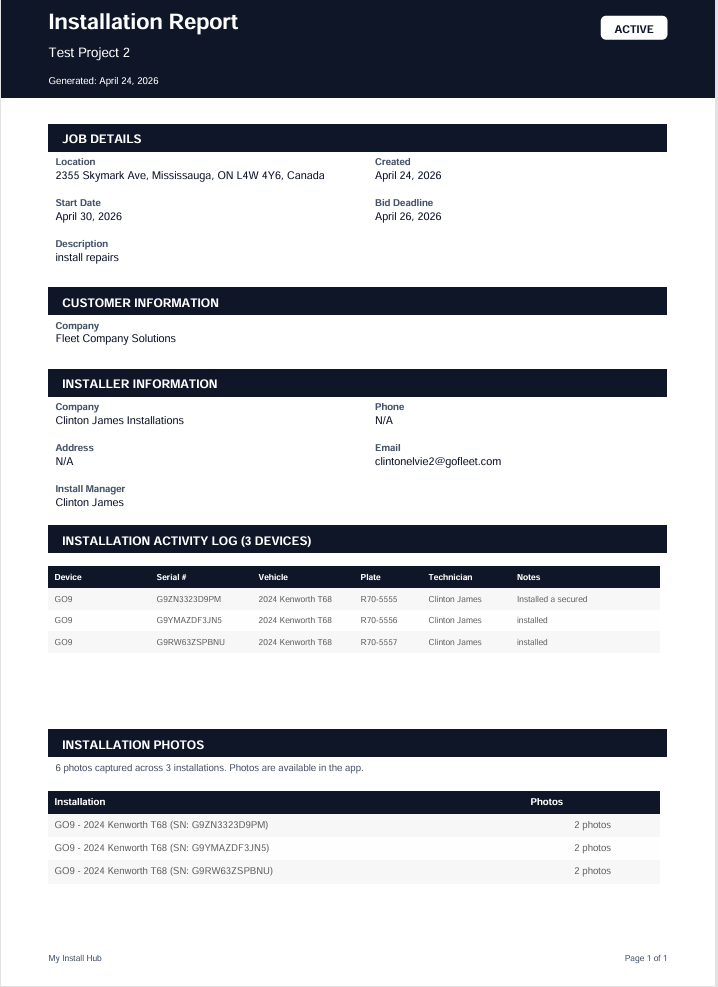
The exported Installation Report — perfect for records, audits, or sharing with stakeholders.